Sunday, July 31, 2011

Wanderings • NYC • Quick Visit

I am not sure the design community - so vibrant in place like NYC - realizes what a culture shock it is for those of us outside the city to come in for a visit. I live about 2-3 hours away (maybe 5 depending on traffic) and get to the city maybe twice a year. Yesterday was one of those days and it is the little things that catch me off guard - things like the shoes the wait staff was wearing at the little place we had brunch, or the window displays, or the food options, or how dressed up people get to walk their dogs, or even how dressed up the dogs are!  Definite culture shock.

In any case I went to the Big Apple for exciting reasons. I was accompanying my husband David as he delivered one of his kinetic sculptures to a gallery on Madison Avenue for display in the front window. If you haven't already checked out his website you should at Wood That Works.


The gallery is An American Craftsman and they have been selling David's work for nearly 20 years.  They happened on a lease for a short term gallery space on Madison Ave. right next to the Whitney Museum of American Art. Great Spot!


The gallery showcase fine American craft and includes beautiful work in wood, glass, metal and ceramics.  And some exceptional kinetic sculptures as well!


If you are in the city between now and the New Year you should check them out at 940 Madison Ave right above 74th Street.


They also have 2 other NYC locations plus locations in Stockbridge, MA and Savannah, GA as well.

Manhattan Times Square Hotel
790 7th Ave, corner 52nd St
New York, NY 10019
Phone: 212-399-2555
Gallery 55
150 West 55th St
New York, NY 10019
Phone: 212-757-7757
Madison Ave
941 Madison Ave
New York, NY 10021
Phone: 212-399-2555
Stockbridge
36 Main Street
Stockbridge MA, 01262
Phone: 413-298-0175
Savannah
223 West Broughton Street
Savannah GA, 31401
Phone: 912-239-8989


©2011 Ashbee Design, Marji Roy

Saturday, July 30, 2011

Cement Balls Rolled into Place!

Today we uncovered the remaining four concrete balls (See post 1, post 2, post 3 for additional info) and rolled them into place!  Exciting.


They are a short distance into the woods surrounded by natural wood grass, and are visible from David's studio and from our hiking trails.  

The last four have been curing for a number of days so we removed the black plastic. They are still a molted gray. In a day or two they will dry and match the original three. We are a little surprised by how white the concrete is but we expect it will weather to a different shade of gray. Time will tell.


Even though they are very heavy we had no trouble moving them. I expect we will rearrange them regularly, and the kids will do so again every time they come home to visit.


And here is a view with me in it so you can get a size relationship.


We love our woods and our growing sculpture garden! Sculpture Week 2011 is over. Both David and I are back at work but what fun we had. Time to start thinking about ideas for 2012. In the meantime we are considering titles for this sculpture. Any thoughts?

Previous links of interest:

©2011 Ashbee Design, Marji Roy


Friday, July 29, 2011

More on Ball Construction

See part 1 and part 2 to this post here.

Three balls done and four to go!

As we approached the last four balls for our sculpture we applied some learned lessons. We knew there was a lot of waiting time between applications of concrete because of the set time. We also had learned that the 30 minute set time of the Quickrete was plenty to work on multiple balls at once. We decided to work on 4 at once.

This time we used both beach balls but also the very large children's bouncy balls. They had some 24" chilldren's balls at Walmart for $2.50.  They also worked well as an armature.


We also taped both edges of the hardware cloth to prevent punctures, used the 1/2" mesh, and applied the hardware cloth in complete circles- no partial pieces.  We also didn't try to cover all areas.

In mixing concrete we mixed full bags as we started the ball and then decreased to 1/2 and 1/3 bags as we finished them off.  In the initial application we could easily apply a full bag before the concrete started to set. We worked without the collars and just applied the cement to the top, let it set and then rotated it. It took about 6 rotations to cover the ball.


It saved time to work on four balls at once. Each was placed in a five gallon bucket but the larger ones were also balanced in an 18 gal tupper tub. We had filled the bottoms with water to provide a heavy base that wouldn't tip as the balls got heavy.


It was at the end that we learned all bags of concrete are not the same and we had some that seemed to have a much higher percentage of stone. We had trouble working this concrete and piles of it fell off. We purchased a bag of just plain mortar (no stones) and started adding cupfuls of that to our batches to create a better mixture. Next time we'll start that at the begining. The concrete with added mortar worked better, stuck better and gave us more control.


Soon the balls will be ready to be uncovered.  As a teaser we uncovered the biggest ball and rolled it into place.


Hopefully later today we will add the four new ones.  


Previous links of interest:

Wednesday, July 27, 2011

Lessons in Ball Construction

Read my first post about the beginning of this project here.

The construction of the field of spheres was spread over a week because of the nature of cement, our experimentation and other obligations. We started small with a 18' and 24" sphere, then went to the big one and then on to four at once. Here are some discoveries along the way....


We used corrugated cardboard and created collars to help hold the cement. The goal was to maximize the area we could cover in a single application. This was on the spheres that used the 1/4" mesh hardware cloth. We found the collar wasn't necessary when we changed to the 1/2" mesh. In the above photo we applied the cement down to the collar. We let it set from about 30 minutes, removed the collar and chipped off the ridge. After doing both sides it looked like this.....


Kind of scuptural as is. We then filled in the equator in several apply/set steps. We had to keep the balls wrapped in plastic and wet between applications because the weather stared getting very hot. We wanted to slow the curing process down so the two first balls were wrapped and ignored for several days as we tackled the big ball.

Ideas we applied to the big ball were as follows:
1. We wrapped it in multiple layers of plastic film hoping to be able to reuse the ball but also to skip the taping of the edges step. This was a mistake. We couldn't get the ball out of the sphere and the ball did get punctured. We kept a compressor nearby and kept filling it up until the first layer was set.


2. We moved our work area into the woods near the final location because we don't think this big ball will be easy to move once complete. This was a good choice because we were out of the sun and the final ball is about 400+ lbs we estimate (based on the number of bags of concrete we used- 8 for this one ball). It was a better work area and we stopped filling the lawn with concrete droppings.  Just don't wear crocs to work in the woods!

3. We tried a modified collar supported on five gallon buckets. While this worked well on the smaller balls it didn't on the larger one. It caused a fairly large ridge that we couldn't remove later. The ball has more imperfections in shape because of it.


It was better just working the ball without the collar and applying the cement in sections.


4. The cement worked well into the 1/2" mesh.  The little stones in the cement fit better.


It is really looking impressive and quite round in spite of the lumpy ridge we made with the collar. It is so round that we had to prop it to keep it in place.


As we worked the biggest ball, our two first balls were happily curing in their plastic bags.  Finally, we loaded them onto a cart and wheeled them into the grassy glade to get a first peek.


Very cool.  We knew we needed more. So another trip to Lowe's, more of everything and some more experiments.

At this point family members were starting to call for regular updates and stop by to get advanced peeks.  They all get into the spirit of Sculpture Week - and acknowledge that we are wonderfully weird! More to come....

Updated:


Previous links of interest:


©2011 Ashbee Design, Marji Roy

Tuesday, July 26, 2011

Sculpture Week 2011

It is here. Our favorite week of the year. David and I both take a vacation week and we schedule uninterrupted time together to collaborate and build a sculpture for our sculpture garden. It is a topic of discussion all year as we collect ideas.  In both 2009 and 2010 we created sculptures using PVC piping.  We have a slew of additional ideas in this material but we want a variety in our woods so decided to direct our designs to other materials.  We narrowed in on cement - lots of it. This is one load. By the time we finished this project we had gone back to Lowe's 4 times.  Grand total - 19 bags of Quickrete Fast Drying Cement.


Did you read my posts on balls?  I have a growing collections of spheres and have limited room left for them inside. It is time to expand into the great outdoors with the eclectic collection and we decided to use our Sculpture Week to add to it. Our thought was to create a series of cement spheres so we started with a google search and I found this site- The Artistic Gardener, which gave a little guidance. We decided to work with a beach ball beginning, covered in an armature of hardware cloth, then covered in cement. We had lots of unknowns beginning. Part of the joy of our Sculpture Week is the experimentation and the learning as we go.

The first quest was for beach balls in a variety of sizes. Amazon is our go to shopping source and they did not disappoint. We ordered beach balls in 16', 24' and 48" diameter.  We really wanted a 36" as well but couldn't find one.  In the end, the 48" ball is really only 36" which worked. But now we could use a 30" as well. But did you know you can get a beach ball 10 feet in diameter?  We didn't think that was the place to start experimenting.

We purchase hardware cloth in the gardening section of Lowe's. We started with 1/4" mesh but learned that 1/2" was better for this project. We cut it into strips about 3" wide.


The cut mesh had some interesting properties that we photographed to record. Might be the starting idea of a different sculpture....


The edges were predictably sharp so we experimented with taping the edges using plain old masking tape. At first we taped one side, then none, and then both. Taping both edges worked best. The others tended to pop to beach ball.


We wired the ends together. We tried staples and taping but short wire was the quickest.  We also learned not to make the strips too tight. It helped in applying the concrete if they were lose so you could force some concrete into the mesh.

Here is a ball set for the mud...


And here we go. We learned to just add water slowly. Cement goes from the wrong proportions to the right one fairly quickly. We started with small batches in an old dish tub but moved to bigger batches as we gained confidence in the process. 


On day one we applied the concrete right to the wrapped ball trying to get it to stick.  Because the wire mesh was too small we had trouble but solved the problem by working in small areas.  

At the end of day one, as we left the balls to start curing we thought about modifications.  Return tomorrow for more on the creation of cement spheres.

To be continued.....  
Part 2 here.

Previous links of interest:


©2011 Ashbee Design, Marji Roy


Monday, July 25, 2011

Celebrate the Cord

Topic switch here. Last March this lamp design crossed my screen and I loved it.  I filed it in Evernote. Not only does it not worry about how to hide the cord - it is the cord!


It is a clever and whimsical kit you put together yourself.  Here are the parts starting with the iconic grange extension cord....


And here is the first step.


It is from Creighton Berman Studio.
But it all came to mind this week because it is a featured item at Fab.com- the decor flash sale site at a greatly reduced price for a very short time. Tempting!


Previous Posts of Interest:

©2011 Ashbee Design, Marji Roy


Sunday, July 24, 2011

Staining the House- After 32 Years!

When we built our home in 1978 we decided to side it with white cedar clap boards. They have a natural preservative and don't need to be painted. And for 32 years we didn't paint the house. The first two decades all was well. With regular bleaching the house stayed a natural graying color, pleasing to the eye and in harmony with the surroundings.  But more recently the house no longer cleaned up with bleach, it was decidedly weather-beaten in appearance and whenever wet or damp it looked positively unkept. Also areas of rot were starting to appear. We decided it was time to have everything stained - the house, woodshed and garage - EVERYTHING! It took us several years to be sure, then some more time to explore color, and then a year to secure our favorite painting team. The whole time we were saving money for this project because it was definitely not something we wanted to do ourselves!

We have a truly unique home. It was designed by me and David and I built it ourselves back when we were young enough to work from 6 AM to 1 PM on house building and then do the regular job after that. What a year! It is a passive solar house, designed after the oil embargo in the 1970's and very much back in fashion. It is a berm house meaning it is backed into the hill with sweeping windows on the southern and eastern faces. We heat the entire thing on 4-5 cords of wood per year. Here is a photo taken about 2 weeks ago on a sunny day.  The siding looks ok in the sunshine, a little splotchy. But it looks terrible on a damp day.


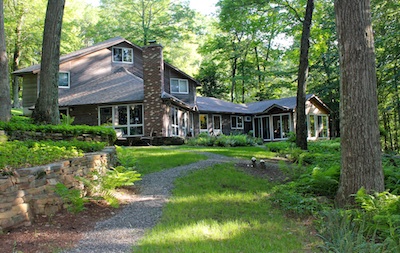
And here is a view from the driveway and entry side.


It took us a longtime to decide on a stain color. We knew we wanted to stay with earth tones so we were in the blue, green, brown, gray color cards. And I stared a photo album of houses we liked. Over time we narrowed it down to the blue-green hues and after a lot of thought we decided on Benjamin Moore Silver Pine AC-21. It is a gorgeous color on the color card.


Tony is our painter and he and his crew are worthy of a post unto themselves - fun, talented, hardworking and excellent at what they do. Tony came and painted a sample of Silver Pine.  It was nice but we kept looking at our front door color and thought it was nicer. I went back through the records to learn that we had used Benjamin Moore Amazon Green 2136-30 on the doors so Tony got a can of that as well. Both samples were applied in a corner near the white trim.


The Silver Pine was nice but the Amazon Green was far richer. Given the nature of photography and screen colors I am sure that all of these colors look differently on your monitor than mine so some day, check out the samples at your Benjamin Moore dealer. The crew started painting Benjamin Moore Amazon Green 2136-40. I do have issue with the chosen name - not at all what I think Amazon Green to be. I think it is more of a Mallard Blue but with the thousands of names Benjamin Moore has to come up with I understand the impossibility of the task.

It took a crew of seven six days to finish everything and we are very, very pleased with the results. Here are a few photos from different angles. There are no open views.  The house is located on a wooded hillside so trees are everywhere.


Our house has interesting lines in the basic architecture of it and they were all hidden with the faded natural siding. The combination of the Amazon Green and white trim again emphasized the composition of triangles.  We went with Brilliant White trim to match the Anderson Windows which have the white vinyl wrap. No painting needed there!

Here is the driveway view....


I always have a harder time with the door colors.  I know the recommendation is to have a complimentary color for the doors and the Benjamin Moore Color viewer selects a tan but that just didn't fit.  Instead I went one shade darker to Regent Green 2136-20.  It is on all the house and garage doors.   


And here is the painting crew........ They used Benjamin Moore Arbor Coat latex stain and were very please with the application.


Thanks guys.  We love it!


©2011 Ashbee Design, Marji Roy


Friday, July 22, 2011

Sculpture Week • 2010

Building up to 2011 Sculpture Week.  Those pictures will follow soon but I wasn't blogging during previous years and for me Sculpture Week is the ideal creative DIY - or better yet DIWF (Do it with Family) - experience.  I posted about our first sculpture week previously here. It was such a success that our younger daughter, Karen decided to take her vacation during sculpture week 2010 and come home and participate in the creation experience.

In 2010 we worked on an idea from David.  He had been designing for weeks on the computer. We knew we again wanted to use PVC pipe but this time we had decided on a sculpture using replication of a single unit - 1 piece repeated over and over but assembled in a way to make an exciting form.  The orginal idea was a towering apex like this...


And it was with that idea in mind that we started cutting, finishing and bolting together hundreds of short sections of PVC piping.


And then we combined sections together into ribbons and soon learned that the construction technique resulted in forms far too flexible to build what we were planning. But ohhh what neat forms it did make......


And what fun we had playing with these new forms and their possibilities. The ribbon was so dynamic that we ended up taking quick videos as we experimented with possibilities.


The sculpture was partially disassembled into lengths we could lift, loaded into the truck and brought close to the site we had selected for installation.  We chose the front hill that faces the road just so the neighbors could also enjoy this sculpture. I wonder what they have had to say about it........?


Sections were reassembled in the middle of a grassy glade.


And we started playing with the possibilities of the ribbon and the site. Here is loop-lump-loop......


Or how about two loops, a big lump and a swirl up the tree?


Each presentation had to be viewed from all angles because the appearance changes drastically from various views.


Every couple of weeks we changed the sculpture. Until we reached the triple loop. It has stayed that way throughout the winter and into 2011.


We title this sculpture "Flexibility" both because in its final version we can change it, and because we were flexible during the construction of it. 

Our DIY sculpture garden is growing. 


Previous Posts of Interest:


©2011 Ashbee Design, Marji Roy