Sunday, November 18, 2018

Christmas Crafting - 2018

Every Christmas I try and design two things in paper- a Christmas card and a few ornaments for our tree. Both are done for 2018.


The card is a contemporary pop-up design featuring a mixture of fonts, colors and patterns. It fits into a standard 6" x9" booklet envelope. The cutting file is here. The assembly tutorial including video is here. I hope to design a Happy Birthday version soon.

For ornaments this year I continued working with the cube shadow box theme that I first introduced with a valentine. I designed three for this series including a star, nativity and snowflake. I generally avoid bling but I really liked the touch of glitter on these. I did make an incredible mess in the craft room with the stuff though. I still have sparkles on my clothes.


The cutting files for these are available here. Online assembly tutorial with video is here.

Happy holiday crafting everyone!!!!


Tuesday, October 9, 2018

2018 Additions to Tea Light Village.

I have been creating buildings for Tea Light Village since 2014, and each year I seem to design 2 more. 2018 is no exception. I have just added a Barber Shop with iconic pole and a Covered Bridge with a horse-drawn sleigh to the store at 3dcuts.com.


Both are great additions to this charming village.

The covered bridge reflects some of the design elements you will find a various bridges around new England. The sleigh comes with driver and a tiny tree for the back.

The barber shop file includes a bench, picket fence, and a pine tree.

Download links:
  • 2018 Additions: If already have Tea Light Village buildings up through 20717 then you can add the 2 new files for $2.59 here.
  • 2018 Complete: If you don't have any of the village you can get all 16 buildings in one download for $12.59 here.
  • See all the available download options here.
  • Barber Shop assembly tutorial is here.
  • Covered Bridge and Sleigh assembly tutorial is here.
Which will you make first?

Happy crafting everyone.
Marji
3dcuts.com

©2018 Marji Roy


Tuesday, September 18, 2018

Haunted Zig Zag Village

Yes, this is natural extension of my first and second versions of Zig Zag Village. Here is the Haunted Mansion version. It is complete with cats and bats, and pumpkins. Included is a haunted graveyard and outhouse. Pair the card stock mansion with some webbing and orange LED fairy lights and it becomes  spooky, fun Halloween decor.

Center


Pair the card stock mansion with some webbing and orange LED fairy lights and it becomes  spooky, fun Halloween decor.


The cutting file is available here:  http://3dcuts.com/zig-zag-village/hauntedThe detailed tutorial (including a video) is herehttp://3dcuts.com/zig-zag-village-haunted-tutorial 


Happy Halloween everyone!


Sunday, August 12, 2018

Zig Zag Village - It folds up!

Fellow crafters - It is never too early to start our Christmas crafting. Yesterday I released a new project that will get you started if you haven't already.

Check out my new Zig-Zag Village. I designed this because so many people have commented on how they love Tea Light Village but don't have storage space. I wanted to design a village that folds flat. And Zig Zag Village does just that! Of course this opens up the possibility of mailing it as a gift so I designed it to fit in a standard 6" x 9" booklet envelope.

The village is filled with charming details like window and door frames, porches and Christmas Wreaths. You can light it with standard LED tea lights or there are included bases for installing LED fairy lights.  Directions for all of it is included in the online tutorial which is complete with video assembly instructions. And below is a short video showing the ease of the folding.


Happy crafting everyone!


Wednesday, June 13, 2018

Christmas Already?

Well not entirely. This new star design of mine could be used a Christmas decor project but it also works for so many other celebrations. Stars are universal. They are appropriate for patriotic holidays, for awards ceremonies and for many other celebrations. Don't limit yourself. This is one of those files that you can use over and over again.  Check out my new Star Light Pillars.


The file includes  pillars in different heights, each constructed of 2 simple pieces. Once the design is glued together the negative space forms a geometric angled star. Add an LED tea light and you add a beautiful dimension.

Here is a Christmas arrangement using the flickering candle-like tea lights.
Switch the lights to the submersible LEDs that come in a variety of colors. Blue works well for any holiday with a red, white and blue theme. 


Consider adding a Happy 50th sign here and you have a great centerpiece for one of those dreaded landmark birthdays. This also uses the submersible tea lights.


And here are the basic pillars. Very easy to make!


And I made a video tutorial to help with assembly.


Friday, June 8, 2018

Hummingbird Shadow Box

I am still loving shadow boxes. I think my fascination with them started with one of those German kitchen wooden shadow boxes that always hung on the wall in my home growing up. I still love them.  My latest shadow box includes a hovering hummingbird sipping nectar from the flowers.


My designing is a little more stylized this time. I have been skipping around with the bird themes. Some trend more toward realism and others are more stylized. You certainly can change the visual impact by using different papers in the back. I used a pearly pink that I had in my stash. That paper made it clear that the birds and flowers would be simple black and white.

The construction techniques for this shadow box are basic 3D skills. I have made a step-by-step video tutorial to show you how to assemble it.

Here are the links to the resources for this fun project:
Download the cutting file here: http://3dcuts.com/3d-decor-items-assorted/3d-star-light-pillars-7-sizesView the tutorial herehttp://3dcuts.com/star-light-pillar-tutorial

Monday, March 5, 2018

Easter Card for Paper Crafters

I use a Silhouette Cameo Cutting machine for my paper crafting and I design all my own files using Illustrator.  I have a sister site 3dcuts.com were I sell these files to other crafters.  And at this site every download comes with the file in SVG, PNG, DXF and PDF formats. That is because ANY paper crafter can make these files.  Here is my latest file design as a 3d Easter Card that can fold flat for mailing.

This file can be made using a Cricut or a Brother ScanNCut but it can also be cut by hand using and exacto knife.  Yes it takes longer, and it takes skill but many people do make my files with out the cutting machine.

In each tutorial I provide links for folks with other cutting machines to help in the prep of files.

  • For the Silhouette: The SVG files from this site will need to be turned into cutting files. Click here for detailed steps on how to use SVG files on your Silhouette. http://www.3dcuts.com/tutorial-upload-svg-silhouette
  • DXF files can be opened in the basic edition of Silhouette Design Studio but often require modifications. I recommend using the Designer Edition and using svg files.
  • For Cricut ExploreHere is a guide for importing into Cricut Design Space.  http://www.3dcuts.com/tutorial-adding-3dcuts-files-to-cricut
  • For Brother ScanNCut: The svg files will need to be transferred to files for your particular machine. You can change SVG files to FCM files at  http://www.canvasworkspace.com/ or Google "How to import SVG files into a ScanNCut" for links to tutorials.

And, after cutting, there is can easy to follow tutorial for the assembly.


Saturday, February 24, 2018

Calligraphic Kitties

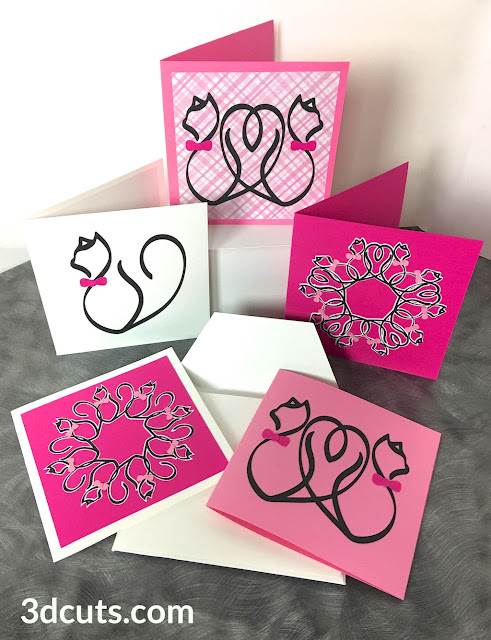
I have been playing around with an Apple Pen on my iPad. I was working to create animals with simple lines. In the end I had to switch to Adobe Illustrator on my computer but I did successfully create a series of sketches. The first batch is of kitties and I created the following 4 files:


The possible uses of these are many. I have never used vinyl but I would love one of the mandala designs on a t-shirt with real bows stitched on. Attempting a vinyl project with my Silhouette is still on to to-do list. I know I should but I am a paper crafter at heart. And so with paper I first made a shadow box with the mandala.


And then I made a series of note cards. The creative possibilities here are endless. I'd love see what you can do with your paper stash to create some greeting cards with these files.


Also check out the video I made giving hints on creating the shadow box.


Friday, January 26, 2018

Shadow Box Video Tutorials

It has been a long time coming but finally.......I put aside the time to learn how to make video tutorials. To date I have completed three.  The first was a little one for a simple project for Valentine's Day.  Check out this tutorial on the Cube Heart Shadow Box. This shadow box can folded flat and be mailed!


Then I got brave and created a video (well actually four) of the steps for assembling my new Heart Tree Star Shadow Box. This is the most complex paper crafting project I have designed but it has some neat engineering in it to help others also create it....and that is so much easier to demonstrate in a video.


An exciting special note on this video is that it also applies to the Deer in the Forest and the Horses in the Pasture Star Shadow boxes. I used the same techniques in all three.


And, although the timing is certainly a little late, I just uploaded the video tutorial for the Star Nativity Shadow Box as well. Maybe you are inspired to start prepping for next Christmas!


Interested in any of these projects? Here are quick links to the cutting files and the tutorials
  • Illuminated Star Show Box cutting files here.
  • Heart Cube Cutting File here.
  • Deer Tutorial here.
  • Horses Tutorial here.
  • Heart Tree Tutorial here.
  • Heart Cube Tutorial here:

Happy crafting!
Marji
3DCuts.com
©2018