Showing posts with label Art. Show all posts

Wednesday, September 6, 2017

Love What You Do!

I found this poster over at the Ink Society at Etsy. I hope everyone reading my blog falls into this category. I can think of many places to use this poster in a decorating scheme. The teal blue could be the punch color in an otherwise neutral space. Imagine a home office with gray walls, white trim, this poster a a few other teak accessories.


Even if you aren't up to redecorating around this poster, think about how to make it true!

©2011  Ashbee Design, Marji Roy

Wednesday, August 22, 2012

Optical Art Using Blue Painter's Tape

Design Sponge sponsored a Blue Painter's tape project last month and I was inspired to create. This month I have discovered that my project wasn't selected in the final 20 so I can instead share it with everyone on my blog. After looking at my project you can hop on over to Design Sponge and look at the other entires. Still waiting to see the final winner.

Here is my submission:


My art students back in the 70’s were enthralled by the optical art work of Victor Vasarely. I developed a lesson using masking tape as a paint block that they used to help them create paintings with sharp lines and strong optical patterns. They were often frustrated because the paint always leaked under the edges of the masking tape requiring a steady hand to repair. When blue painter’s tape hit the market and was advertised as having the edge lock, I thought back to my students from decades ago and knew this magic tape would have made their end projects so much easier. With this project I decided to test the materials to see if in fact, it would make creating quick, visually strong, optical paintings easier. I was right. It was a breeze. 


Directions:

Supplies needed:
  • 1 piece smooth surface hardboard like masonite 
  • 1 roll 1” Scotch Blue Painter’s Tape
  • Spray paint in two contrasting colors (I used black and aqua. Complimentary colors also create especially strong optical effects (red/green or orange/blue) and just about any light color creates a striking effect with black.
  • Exacto Blade or single edge razor blade
  • Metal ruler


The Process:
  • Cut the masonite to the desired size and sand edges. (Mine was 14” x 14” x 1/8”. I would use ¼” thickness on larger sizes. If using 1” tape, make the masonite square ending in an even number.)
  • Spray paint it using the lighter of your two colors. Working in a well ventilated area build up many light coats. The number of coats depends on how light your color is and the coverage but keeping putting on coats until the surface is a solid color. Be sure to paint the edges as well as the flat surface.


  • Allow to dry thoroughly. I let mine dry over night.
  • Find the mid point of two opposites sides and draw a straight line across the surface there.

  • Apply the first piece of Scotch Blue Painter’s tape to the surface with its edge lined up to the line drawn across the midpoint.  The tape should go completely from edge to edge with about ½” over hanging to wrap around to the back.
  • Apply the second strip of tape exactly parallel to the first. Try to not leave any space between, but also don’t let them overlap. Press each piece firmly in place giving special attention to the edges. Cover the entire surface with even strips of tape. Fold the ends over on to the back of the board.


  • Draw a geometric design onto the tape. My design was created by measuring the mid point of each side and connecting them thus creating the diamond shape within  the square. Other shapes can be used as well. Use a ruler or compass and be precise.
  • Using either a single-edge razor blade or Exacto knife and a metal ruler, cut along the lines you just drew on the blue tape. The goal is to apply enough pressure to cut through the tape cleanly.

  • Peel off every other piece of tape.

  • Again make sure all edges are sealed tightly by pressing them all. Fifty percent of your design should be removed.

  • Paint over the entire surface with your second, darker color of spray paint. Do many light layers to keep a nice smooth finish.  Work in a well-ventilated space. Be sure to paint the edges as well. Allow the paint to dry.

  • Carefully peel off all the remaining tape.


Have fun finding a home for your new painting!


Sharing this post at the following Link Parties:
Hope to see you there as well!

©2012 Ashbee Design, Marji Roy


Friday, August 3, 2012

Denim Blue Jeans • Wall Art

Denim is the source material for many artists and craftspeople creating wall hangings. Many use recycled denim because of the all the various hues created by the washing and wearing of denim. Gradations of color in denim is soft and appealing. The ultimate in ombre effect!

Of particular interest to me are some of the American flags and USA maps created entirely from denim. Denim, and blue jeans in particular, are certainly world-wide attire however they are particularly representative of American culture. I wonder if this is because of the history of blue jeans and Levi Strauss.

These two flags are by British textile artist Ann Carrington.


I found many USA maps quilted from denim as well.  This particular one is available for purchase from vintage collectors at Splurge.
Source: Splurge

Other wall hangings are more abstract. This one is highly effective because of the complementary bright orange stitching.
Source: Name • Via: Curlby

Use of the Gradations is especially effective in this Starburst by Julie at Through the Cats Eyes.
Source: Bellarosa • Via

Mohammad Hirzallah used denim in this layered cityscape.

Source: 7irz

A visit to Denimu's website is inspiring. There  are many portraits and urban cityscapes all created by using denim pieces. Very dynamic use of shape and contrast to create arresting images.


Previous Posts of Interest:


©2012 Ashbee Design, Marji Roy

Sunday, June 24, 2012

Wooden Wall Collage

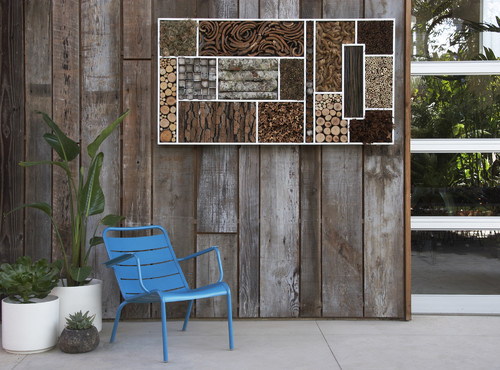
If you follow my blog you know I love wood. I love working with it, I love it in decor, I use it often.  Today, this post appeared as part of a Houzz article on an initiative in San Francisco to create pockets of nature inside the urban landscape. This wall piece was one of many samples. I love how wood in various forms is used to create a collage. and it reminds me of my branch series all combined into one work of art.


The above panel is created by artists Lisa Lee Benjamin and Kevin Smith. They are part of group called Urban Hedgrow and consider themselves "instigators" working to create public awareness of the environmental processes happening around us.

I see it as a great piece for inspiration.

©2012 Ashbee design, Marji Roy

Sunday, July 17, 2011

The Joy of Giving

Gramzee Series Part 6:

Teaching the joy of giving is so easy to do with children and it is one of those life lessons that shouldn't be forgotten. One of the ways I taught my kids this joy was through their annual birthday gift to their Dad.

This idea works with kids or grandkids.  I started it with my children when they could first draw.  For their Daddy's birthday I had them create a drawing. They framed it by putting it one of those plastic insert frames for photos. And they - at age three proudly gave him a birthday present made just by them.  We repeated it every year. And now we have a beautiful history of the drawing development of our daughters.

Here are the first five drawings completed by each daughter. You can view the entire series by visiting my Picassa page with links noted below. It is entertaining to notice the development of both the human form and perspective through the years. Very classic.

The first set is by Karen beginning in 1985 when she was almost three. Karen's entire collection of kid art for her Dad is here.

by Karen 1985

by Karen 1986

by Karen 1987

by Karen 1988

by Karen 1989

And here is the series by Amy starting in 1984: You can view the entire collection of Amy's Kid art for her Dad here.

by Amy 1984

by Amy 1985

by Amy 1986

by Amy 1987

by Amy 1988


I decided on a small frame size ( just 4' x 6") and about a month before his birthday I provided paper the correct size.  The girls could draw as many drawings as they wanted and select their favorite or just draw one. We had them all displayed in a collection of frames on the wall at the foot of our bed. When they stopped the annual gift, they were in high school and we had a collection of 32 frames filled with brightly colored art. It was a focal point that often lead to interesting discussions as the girls grew.

We have since removed them for other decorating ideas but saved them. I scanned them all for this project and David is going to start using them as the background images on his iPad.  So there is the adaptation for the current generation. Have the kids or grandkids create art to be used as either a screen saver slide show or background images on iPhones and iPads. And if they do draw them on regular paper with marker and crayons, scan them.  They fade terribly over time and part of the beauty is in the color.

And, my girls know from experience that it is truly more blessed to give than to receive.


Previous Posts of Interest • The Gramzee Series:


  • Families Working Together

  • Kids Nook

  • Preserving Memories

  • Family Projects • Trees

  • Gramzee Week

  • Passing It On • Being Creative Matters


  • ©2011 Ashbee Design, Marji Roy

    Thursday, June 9, 2011

    One of a Finds

    Have you ever paid attention to the CB2 "One of a Finds" area?  I love it and have purchase various decor items for my home from that collection.  These cogs that march along the garden wall came from that collection.


    CB2 describes the shop as "One-time-only original works created in collaboration with passionate artisans we discover on our travels around the world.  Each has a unique story to tell, an encounter to share, a history to pass down, a community to engage with. Truly one of a kinds. each special find will be offered only once in small limited editions for collectors and enthusiasts."

    Today they released a letterpress poster series "Accept and Be" in 9 different compositions. It is a limited edition by Kennedy prints.


    But you have to be decisive.  The items are in very limited amounts so if you like it, buy it! Now!

    Monday, May 16, 2011

    Wanderings • Boston • Chihuly

    I was at RISD during the Dale Chihuly years and wherever I travel I find Chihuly chandeliers installed. You know the ones - brightly colored hanging masses of blown glass spermatozoa. I felt I had to go see the Chihuly show at the Museum of Fine Art in Boston this past weekend.

    I am glad I went. I have mixed reactions to the work but ohh, the photo opportunities were special.


    Yes, I have to admit to feeling that a Chihuly glass sculpture has become almost common place. And yes, I'd like the artists that create these works to get their names listed as contributors. But all arguments aside, I loved the first display at the entrance to the show.


    The red, yellow and orange forms brilliantly lit and placed on reflective black surfaces were stunning. 

    And the room arranged as a replica of his collection of Northeast Indian Art and the glass it inspired was also noteworthy. Here amidst blankets and baskets and a phenomenal wooden slab table were the Chihuly "baskets" nestled together. Stunning and full of life.


    I had seen his reeds arranged in birch logs in photos before but they were truly memorable in reality. A subtly of gradation that doesn't come across in photos was present in reality.

    Neodymium Reeds on Log 2008 Chiculy Studio

    But many of the other pieces were a noisy cacophony of color, shape and texture lacking any restraint.  

    Ikebana Boat, 2011 Chihuly Studio


    But that is okay.  I was inspired by the work and I liked the beautiful presentation of all of it.  And it was great for photographs!


    Detail of Millie Fiori


    Chihuly: Through the Looking Glass is at the Boston Museum of Fine Arts through August 7, 2011.


    Friday, April 29, 2011

    Wanderings • Boston • Jamaica Plain

    Living creatively requires collecting inspirations. I collect them from many resources and try to regularly attend unusual and interesting events with that goal in mind. Yesterday David and I traveled to Boston for just such an event. We wanted to attend the opening of an art show called "Move Me" at the Axiom Gallery in Jamaica Plain. But first we met up with our daughter Karen for dinner. It was raining, and she texted that she was waiting in a hat shop nearby. What a delightful experience. Salmagundi doesn't yet have a website but it is worth a visit. The shop had over 7000 hats of all types and styles. Some like this beautiful extravaganza modeled by Karen were designed by the owners.


    We then had an enjoyable early dinner at VeeVee's. Creative, good food but what caught my eye was they too are using tree buds for decor. I did a post here a few days ago on my similar approach. Theirs were dogwood getting set to bloom but they looked stunning against an orange wall.


    We then meandered over to Axiom Gallery for the opening of Moves Me, a collection of work by five kinetic artists - Chris Fitch, Arthur Ganson, Tom Haney, Steve Hollinger and Erica von Schilgen. Those that follow this blog will know that kinetic sculpture is part of the life blood here at Ashbee Design and I'll be writing more about this show over on David's Wood That Works Blog soon. Here are a few images from the show to provide a sampling.


    Karen winding No More Bad Dreams by Erica von Schigen


    Detail of No More Bad Dreams by Erica von Schigen


    Looking into Falling by Chris Fitch


    Detail of Machine for Softening Hard Hearts by Arthur Ganson


    At an outing such as this I bring along a camera and I take pictures for my inspiration journal. These aren't necessarily artistic photographs but they serve as reminders for me of ideas that sparked my creative side.

    Have you gone on any creative wanderings recently?


    ©2011 Ashbee Design, Marji Roy


    Wanderings - Somerville Open Studios

    Does your community have an Artists' Open Studio weekend?  If so check it out.  It is a great resource for inspiration and adding to one's own collection of wonderful things. This weekend, April 30-May 1, 2011 is open studio weekend in Somerville, MA. We attended last year and were amazed at the number of open artists' studio in a very small area.  Below is a photo of the map for this year's event. Each orange dot is another studio.  


    It is a great way to spend a weekend day.
    Click on this link to get a downloadable map to view.
    Click here to get more information about Somerville Open Studio.


    ©2011 Ashbee Design, Marji Roy

    Monday, March 21, 2011

    Nostalgia • Composition Paper

    Two connected items crossed my screen recently. They were spaced a couple of weeks apart but they stirred up a little nostalgia. First came this work by Brock Davis.


    There are definitely times that I have felt my lines were becoming unravelled. What a stunning metaphor for that feeling. But I was drawn to the composition paper. When is the last time I have written on it?

    Two weeks later these pillows were shown on showboxdwelling.com. I again was instantly drawn to them.


    My reaction to the second exposure to old fashioned composition paper made me realize a little nostalgia was at play here and incoporating that into decor gives we a warm fuzzy feeling. Interesting new observation. I'll have explore my home to notice other places I might have used this concept to make our home a place we are comfortable in.


    ©2011 Ashbee Design, Marji Roy