Sunday, December 30, 2012

Laundry Room Reveal • Specialized Storage


This is the fifth post in my laundry room reveal series. Click here to start at the first post.

I have waited 33 years to finally finish my laundry/pantry/utility room.  In those years I have used this space extensively and before I started the design process I noted all the different functions this room will need to perform when completed. It is often easy to reduce functionality for design and I just don't have a big enough house to do that. I expect most of you are in the same boat. Solution - keep in mind the function of the space above all else. Good design incorporates that. Here are some specilized items that I didn't forget in the process:

The Vacuum Cleaner:
It needs a home. The home has to be convenient and easy. Reality is we have to vacuum often. My solution was to keep an assigned place right in the front corner of the utility area for the vacuum cleaner. 


Slide open the IKEA Kvartal sliding panel and right there is the vacuum cleaner. I also put a double outlet in this location hoping someday there will be a cordless option. And I might add another dust buster to the wall there as well. Trying to predict technology here.
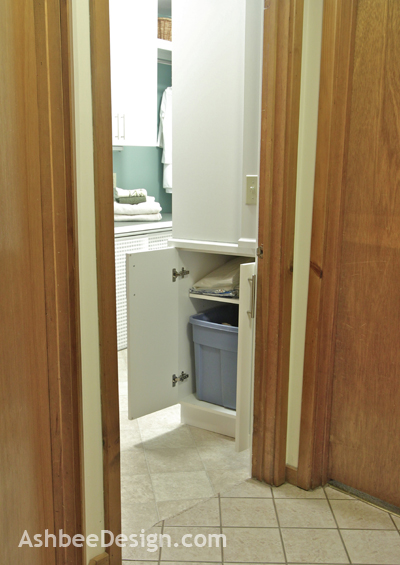
Folding Stool:
I have put in tall cabinets as high as posible. I wanted to use every square inch of storage space. Inconvenient storage space is fine for items rarely used and it is absolutely better than no storage space for them! Solution: Design in a space for a sturdy, easy to use folding stool to allow for easy access to high shelves.


David and I discussed this one at length. Originally I had the stool over on the side of the washing machine but as the room took shape, it was clear we needed it in the cabinet alcove. I narrowed the folding table a little more to make room for the stool right next to the cabinets. I use it all the time and it is quick and convenient.

Recycling:
We had a recycling bin right inside the laundry room door in the old laundry space. David insisted the new room needed one there as well and getting that to fit caused some adjusting by the cabinet designer. But she did it and right inside the door, inside a closed cabinet is a double layer recycling area. 


The lower area is a big bin for our single stream stuff. It easily slides out when full and gets replaced by another. Above on the shelf is a bin for junk mail - papers, etc. The cabinet works well and we prefer the recycling out of sight.

Canvas Bags:
Like all good New Englanders I have an extensive collection of L.L. Bean canvas bags (plus assorted others). I used to store these in the back of our bedroom closet, behind the hamper, under the stairs. Each time I needed one (which was often) I had to go digging in the dark. I decided there would be convenient storage for my collection of bags in this refurbished space. I added heavy duty hooks to the wall in the utility area to hang my bag assortment. This was one of the first things I moved into the new area and it is a huge improvement!


Lazy Susans
I love the idea of using the space behind the cabinet kick boards for added storage. I requested that the kick boards not be attached. The fit is tight enough that they stay in place and I can pop them out as needed to have access to that large flat space behind. I currently have my lazy Susans in one.


Laundry baskets and clothing for donation:
This room is my laundry room primarily and in the old laundry room I had several laundry baskets and several large bins. The laundry baskets are used regularly for all types of things and the large bins were easy storage for clothes to donate - part of the on going thinning out process. Both are large and needed dedicated space in the new room. I didn't put cabinets under the folding table but instead always kept in ming this sizes of the laundry baskets and storage bins. As I modified things I needed to be sure to leave spaces for these large items.


Losers:
There is one important item that didn't fit into the redesigned space and that is my folding chairs. I have six that get used during those big entertaining events. Originally I had thought they would go on wall brackets above the water pressure tank. Once we started working with the plumber, he suggested a water filtration system to help with the the high sediment level we have in our well water. That took up the space that was reserved for the chairs. I then thought I would move them to the wall next to the fuse box, but then the electrician came and said we needed to expand our fuse box to take care of the added electricity I wanted in this room. So I lost access to that wall. In the end the chairs had no home and were moved to the top of the garage. 

Other Posts in the Landry Room Reveal:

Other Laundry Room Redesign Posts _ Planning and construction

    ©2012 Ashbee Design, Marji Roy


    ***************************************************************************************************************************
    Sharing this post at the following Link Parties:
    Hope to see you there as well!


    Friday, December 28, 2012

    Laundry Room Reveal • The Ironing Board Solution

    This is the fourth post in my laundry room reveal series. Click here to start at the first post.

    I have hinted that the solution for my ironing board was something new, not in the plans. Well here is a quick photo of me getting ready for Christmas Eve and using my ironing board. (Yes, I am wearing reindeer antlers!)

    I posted back in June about many of the ideas I had found on the web. But of all those solutions, (because my space is so small and my cabinets not full depth), the only possible solution was to construct a fold out option from my middle cabinet and lose the storage in the upper half.


    Does it look like I have enough extra space to give up that cabinet? I didn't think so either. 

    But once my folding counter was temporarily in place I saw a better, simpler, less expensive way. After discussions with David, we refined the idea and decided to try it out. I gave you a clue in my previous post. See that green striped object under the counter? Yup, that is my ironing board.

    It resides on a shelf just under the folding counter.

    It swings out.......

    Gets placed on top and wedges under a trim board screwed into the studs on the wall.

    It is is easy to set up, easy to take down and works well. I had wondered if the counter would interfere with ironing and it doesn't at all. In fact, I find I have better clothing positioning because the middle legs are gone. This solution works far better than I anticipated. My old ironing board was always covered with stuff that had to be put away before I could iron. Doesn't happen with this one. 

    Here are some of the things we did for this system to work.
    • We removed the legs from a standard metal mesh ironing board.
    • Using a piece of standard wire shelving for closets David crafted a shelf to hang below the counter.

    • I cut a 5/4 thick piece of pine as a holding bracket for the shelf and David screwed little metal plates to hold the shelf in place.
    • We did this before installing the counter so we didn't have to work upside down. This photo shows both the shelf and the IKEA Kvartal track system I posted about here.

    • We used the wire shelf because it is so thin and we were maximizing available height for storage below.
    • I made a bracket out of a piece of pine and screwed it right into two studs. It firmly holds the board in place. The little diamonds are contact paper that hide the screws. I could have filled them and painted over but I wanted to keep access in case future adjusting is needed.

    We had considered also installing super magnets but they just aren't needed. The board stays securely in place.

    I knew I needed an ironing board in this room and I took a risk with the design. The design was finalized and that ironing board was an issue. I kept my mind open and a solution appeared as the space became defined. Keeping an open mind with a project is a skill I have been working on. Being so very concrete-sequential means I want to stick to the plan - always! I am learning the benefits of flexibility. This is a great inexpensive solution!

    Other Posts in the Landry Room Reveal:


    ************
    ************************************************************************************************************
    ***************
    Sharing this post at the following Link Parties:
    Hope to see you there as well!


      Wednesday, December 26, 2012

      Laundry Room Reveal • IKEA Hack • Kvartal Hack

      Third in the series on the Laundry Room Reveal. Click here for the first post.

      The space under my counter for folding clothes was a challenge. The problem started because this counter is only 33" off the floor - not the normal 36" and it is only 20" deep. Cabinets weren't an option unless I had them custom made. But I already had lots of cabinets and what I needed was a place for laundry baskets and storage bins. One of the advantages of finishing your laundry room 33 years after moving into the house is that you know exactly how you want it to work. I knew I needed a different type of storage space here.

      The solution was to install an IKEA hack with modified sliding Kvartal panels to hide this area but still have easy access. You can see the panels below the counter in this photo. They are a white weave fabric that is stiff. What I love about the Kvartal system is its engineering. The pieces are all beautifully shaped and work extremely well as a sliding panel system.

      I used three panels that slide on a triple rail back into the corner to provide easy access to the large items behind. Additionally these panels snap off if I ever need total access to this space.
      They match the sliding door panels we installed in front of the utility corner to hide all the pipes and mechanical elements. The major difference is that those were surface mounted in front of the opening using the standard IKEA brackets.

      These brackets can be combined with another unit to allow you to hang panels from a horizontal surface but the IKEA solution requires you to drop the rail over an inch below the surface leaving a 1" gap.  (These brackets are designed for hanging curtains from a ceiling.) 
      We needed to modify the standard wall bracket to allow us to surface mount the IKEA Kvartal rail directly to the underside of the cabinet without using the ceiling bracket above.

      This is what the IKEA Kvartal wall bracket looks like in its original form.


      David sawed off the angle piece, then drilled and set two screw holes so that the brackets looked like this.......

      The brackets are made of aluminum and very easy to cut and drill into.
      I then attached the rail to the bracket and mounted them to the bottom side of the counter. This held the IKEA Kvartal triple rail in place much closer to the counter underside.


      From that I used the regular IKEA panel system to create three short panels.  Beause you buy the mounting rails separate from the panels I purchased 3 sets of panel brackets and one long panel. I cut the panel into three short lengths and attached the mounting rails following the regular directions. The system allows you to arrange them so that when you pull the first one out, it hooks the second and pulls it out as well. IKEA has a long pole to hook on the first one to pull. That works for wall panels but not for our application. Instead, I bought a standard key ring and inserted that in the hole to pull the panels shut. Works like a charm!

      It is an attractive, flexible and inexpensive solution to covering areas below counters. We used it in our laundry but I can see other possibilities for other areas as well. How about under a desk or in a mud room?

      Tomorrow I'll continue with more of the interesting features in my new laundry room.

      Other Previous Posts in the Landry Room Reveal:

      Other Laundry Room Redesign Posts - Planning and construction:

      ©2012 Ashbee Design, Marji Roy


      ************
      ************************************************************************************************************
      ***************
      Sharing this post at the following Link Parties:
      Hope to see you there as well!