Tuesday, November 21, 2017
Saturday, November 18, 2017
Christmas Crafting Time is Here!
Christmas crafting comes a little early to my craft room because I have to get designs out for others to make in time for their holiday decorating. I have just released the cutting files for 3 new tree ornaments. These are loosely inspired but Polish Folk art. There are 3 different ornaments all similar in design. They each use the curled paper as a 3D element but all can be stored flat!


I also completed the same files in a festive color scheme. Any coordinated pairs could be used so you can customize it to match your Christmas Tree color- scheme- if you have one.

I also spent some time re-doing some old files that were only available in the .studio format through the Silhouette Store. New on the 3Dcuts.com site this holiday season are a couple of my earlier card designs.

And a contemporary classic of mine is the HoHoHo trees for table decor. Again new to 3dcuts this year but previously available on the SIL store.

All of these are available on the Christmas Theme page at the 3dcuts.com website here.
Happy Holiday crafting everyone!
Marji
©2017 Ashbee Design, Marji Roy
Monday, October 23, 2017
Additions to Tea LIght Village
Although it is only October, those of us in the crafting world are moving onto Christmas. And every Christmas I add to Tea Light Village. I started this series in 2013 and it has just gotten better every year. This year it is arranged on a mantle.

There are two new buildings for 2017 - a Tudor House and the Clock Tower Library.


There are two new buildings for 2017 - a Tudor House and the Clock Tower Library.

The house has the off-center dormer and curved door as Tudor characteristics. And the Clock Tower adds another municipal building to the village. The cutting files for these are available at 3dcuts.com here.
This year I have also solved the lighting issue. If you have been building the village right along you have learned that turning 14 different tea lights on and off is a real bother. It was for me so I tend not to light up the village. It really is much prettier when lights are glowing out the windows. So I spent some time thinking about it. What I really wanted to do was use the remote control string fairy lights instead. They all turn on with one press on the remote button. Easy! But I don't like seeing the wires and stray lights between buildings. So I designed a solution.

Available now is a hexagonal base system. You cut the bases you want for the village you have created, attach them together and run wires through the base. It is quick and easy. It creates multi-levels for display plus plenty of room for the wiring. The bases come in 6 depths plus 2 shapes and are available here.
I have a complex village with 16 different buildings. Here is the underside of the hexagon bases showing the wiring of the fairy lights. It was very easy to do and I have put together a great tutorial for you to also upgrade your tea light village.

Using these nifty strings lights available from Amazon (link below) you can improve the lighting in a number of ways.
- All lights are operated by 1 switch.
- The switch is a remote for easy access.
- Flickering is a choice. I disliked the tea light flicker. It made me think of houses on fire.
- You can control the brightness. If the room has other lights on, push the brightness. If the room is dim, reduce the brightness.
These are all huge pluses for me.
Here are the links to these files:
- Complete 2017 Tea LIght Village - $10.59 - Buildings only here.
- 2017 Additions - Tudor House and Clock Tower Library - $2.59 here.
- Hexagon Bases - Not incllude in the complete set - $3.99 here.
Here are links to the tutorials for these additions:
And here are links to the supplies I use for this project.
- Order from Amazon: Neenah Exact Index Card Stock 110lbs. 250 sheets (Affiliate Link)
- Order from Amazon: Scor-Tape 1/4" X 27yds (5 Rolls) (Affiliate Link)
- Order from Amazon Fairy Lights 2 sets 100 lights with remote in warm white (Affiliate Link)
- Order From Amazon LED Tea Lights (24 Pack) (Affiliate Link)
Definitely time to start craft for Christmas!
Enjoy everyone.

Thursday, September 21, 2017
Continuing with the Star Shadow Box......
I love working with the star shaped shadow box. It is such a strong shape and makes up so nicely. I designed yet another series of layers for a new shadow box theme....this time horses!
 Again I used the LED lights from Amazon. I am enjoying including these in my projects. There are so many options that are quite flexible. The ones I used are here. (disclosure: I am an Amazon affiliate.) I choose lights that are warm white which gives an amber glow verses a blue glow. Unfortunately it photographs as yellow but in reality it is more amber. I am still working on the photography aspect!
 Here is a link to the download files:


And here is a link to the tutorial
You should check out the tutorial! I really broke down the assemble into small steps with tons of photographs.
Happy crafting all.
Marji
©2017 Marji Roy, Ashbee Design, 3dcuts.com
Tuesday, September 19, 2017
Star Shadow Box - Deer in Forest
Last week I finished a new Star shaped shadow box. It is a perfect fall theme of deer grazing peacefully in the forest.


I am quite excited about some of the new discoveries. First I re-engineered the inside stacking system. It makes it much easier to assemble - although there are more parts. And instead of tea lights I used LED fairy lights. For one thing, they don't flicker but they are also tiny and malleable. Lots of possibilities there!


- Assembly tutorial here: http://3dcuts.com/deer-in-forest-star-shadow-box-tutorial
- Cutting files here: http://3dcuts.com/shadow-boxes-nature-themes/deer-in-the-forest-star-shadow-box
©2017 Marji Roy, Ashbee Design, 3dcuts.com
Wednesday, September 6, 2017
Love What You Do!
I found this poster over at the Ink Society at Etsy. I hope everyone reading my blog falls into this category. I can think of many places to use this poster in a decorating scheme. The teal blue could be the punch color in an otherwise neutral space. Imagine a home office with gray walls, white trim, this poster a a few other teak accessories.


Even if you aren't up to redecorating around this poster, think about how to make it true!
©2011 Ashbee Design, Marji Roy
Wednesday, June 21, 2017
Musical Mandalas
Here is a new series of Mandalas I designed combining the graphic elements of musical notation with various Illustrator tools. I love the impact of these striking circular designs.


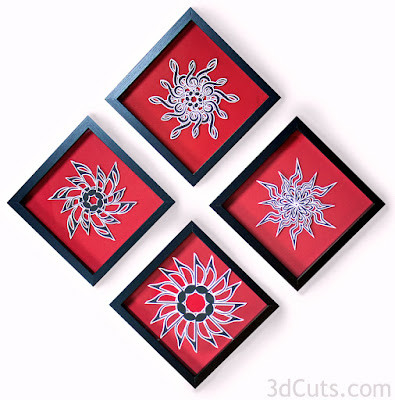

I mounted them on a deep red background and displayed them in Michael's Benton Shadow Box frames.

I created 4 different signed based on the g Clef, 1/16 note, 1/8 note and quarter rest.


The cutting files are available here: http://3dcuts.com/mandalas
and assembly hints and tutorial is here: http://3dcuts.com/musical-mandalas-tutorial
Happy Crafting! Marji
©2017 Marji Roy, Ashbee design, 3dcuts.com
Saturday, June 3, 2017
Another Shadow Box - Canoeing into the Sunrise
I just posted the files for another shadow box for all you crafters that like working in card stock. I just love how the paddler shadow blends right in with the water pattern on the background photo.


I love changing up the background to create different effects. This file comes with 4 different backgrounds for you to experiment with.....or you can add your own.

- File download here:http://3dcuts.com/shadow-boxes-nature-themes
- Assembly tutorial here:http://3dcuts.com/canoe-shadow-box-tutorial
©2017 Marji Roy, Ashbee Design
Monday, May 29, 2017
Aspen Silhouette
Years ago one of my first silhouette projects was a 4 part birch tree silhouette. I love that design and was recently approached by a design firms to re-do it as aspen trees. They were looking for a design to use as a wall mounted metal silhouette sculpture for the outside of a building and they especially liked my birch design. They hired me to adjust and modify the birches using the signature little triangles and create an aspen design. That project is done - but I did retain the rights - so I have adjusted it, made it two levels and put it in a paper frame for paper crafters to make on a much smaller scale. I recently finished the 3D Aspen Shadow Box design.

Back to the design commission.....I don't know where the building will be located that will have a forty foot tall version of this design on its outside wall but based on the communications I have been told it will be a motel. I also know the project name has Durango in it so I am assuming next year some time (2018) this might appear in Durango, Colorado. If anyone sees the final install please snap a picture and send it on to me.
Thanks! Marji
©2017 Marji Roy, Ashbee Design

This shadow box can be created with no back ground letting the color of the wall show through or with a inserted background of either a photograph or solid colored paper. In the design on the left I inserted a photo I snapped in the Great Smokey mountains a couple of weeks ago. I just opened it in Pixelmator and cropped it into 4 squares to fit.
This cutting file is available for purchase ($1.99) including the jpg photos at my web site here:
http://3dcuts.com/shadow-boxes-nature-themes/
The online tutorial for assembly is here:
http://3dcuts.com/aspen-tree-shadow-box-tutorialBack to the design commission.....I don't know where the building will be located that will have a forty foot tall version of this design on its outside wall but based on the communications I have been told it will be a motel. I also know the project name has Durango in it so I am assuming next year some time (2018) this might appear in Durango, Colorado. If anyone sees the final install please snap a picture and send it on to me.
Thanks! Marji
©2017 Marji Roy, Ashbee Design
Saturday, April 29, 2017
Making Mandalas
Did you love the Spirograph toy when you were a kid? I certainly did - and that is the basis of my most recent series of designs.

I got hooked on creating mandala designs based on spirograph type images - and then I expanded from there.


These mandalas are all cut from card stock using my Silhouette Cameo using paper in gradated colors. I chose a blue series to match the wall but this would work in any color gradation series. I have finalized 1o different designs which are available here on my store at 3dcuts.com. Here are the 10 designs currently available.


I got hooked on creating mandala designs based on spirograph type images - and then I expanded from there.

I spent a couple of weeks creating all kinds of designs, cutting them and experimenting with them. I took four different ones and framed them in Michael's Benton 9x9" shadow box frames (they were on sale at 60% plus 15% off!) to hang on my craft room wall.


Some of the designs are a single star pattern made of 3 layers, others are more complicated. One is two layers of stars each made up of 5 layers of card stock in different colors.

Important Links
Files are available here.
Complete online tutorial is here.
Other Options:
Once you start cutting these open your creative mind and think of other applications. Here are two possible uses for the same files - even consider vinyl!


And I have added a freebie to my freebie page. Go here if you want to test your machines file compatibility or skill at cutting fine lines.

©2017 Marji Roy, 3dcuts.com, Ashbee Design
Tuesday, March 7, 2017
Ledge Village Expands - Again!
One of the easiest projects I designed for my Silhouette was Ledge Village. It was for an awkward ledge in my laundry room but I hit upon something with that idea. Many others have loved it and created their own versions. I have been periodically adding to this village over the years, and re-drawing many of the original buildings so they can be shared with crafters that use other cutting machines besides the Silhouette. Las week I again expanded by finally re-drawing a classic Fullerton House in Illustrator and by creating two totally new buildings - the Mansard House and the Town Hall. Here is the entire collection that is available over on 3dcuts.com

I took all my buildings and set them up together for a new town photo and decided to try and light up these buildings. I had learned about Fairy lights from another crafter and these were an excellent solution.

I order several sets from Amazon but liked the battery operate LED type best. The selection always changes but I found a small set with 40 lights and that was just about perfect. I used and x-acto knife to create small holes in the back and inserted the tiny lights inside. Easy and very effective.

And,as part of the introduction, I asked others to send along photos of their Ledge Village. I have a webpage where I share display ideas for Ledge Village here. I got some photos of some wonderful displays.

Ledge Village by Debra Barrows on display at Herman Miller Offices in Zeeland, MI.

Ledge Village by Mary Lynnes on display above her kitchen cabinets.
Here are some resource links:
Subscribe to:
Posts (Atom)