Showing posts with label Kitchen. Show all posts

Monday, March 19, 2012

Design Trends Don'ts • Open Shelves

I have decided to do a series of posts on designs trends that I find incredibly beautiful but terribly impractical. My plan is to do one of these posts per week until I run out of my growing list of "designer trend don'ts." I didn't want to group them together because it just seems so negative to post a series on don'ts when we are all looking for do's!

My first don't is open kitchen shelving. It can be beautiful and I'll give some examples to prove my point.

Every time I see one of these kitchens I pause and give that classic, positive, "Ohhhh!" reaction. In fact, I collect these photos because I love the appearance.

via • via

I, too have white dishes that create attractive, orderly stacks. These do speak to my OCD side and visible order is a beautiful thing.  Mix it with some handmade pottery and wood tones and I am a happy camper.


But the reality is, if I open all my cabinet doors and take stock, it is clear that about 20% of what is in there is visually attractive. The rest, although absolutely necessary for daily cooking and living, just shouldn't be on display. So where do you put it? The bottom cabinets are full. A normal house just doesn't have the space for this trend to be practical.


My question is, who thinks up these trends and how do they become popular? Things in home design shouldn't become trendy only because they look great. They have to function extremely well. Granted we all live in our homes differently and if I didn't cook, I might consider open shelves. But then what about dust? Do you wash the dishes before you use them as well as after? I just don't see the advantage of creating new chores!

via • via

I am embarrassed to admit how stunned I was to see the greasy crud that settled on the top of my old kitchen cabinets. I perched on a ladder with bucket and soap and tried to clean them occasionally, but I knew the job wasn't getting done. When we had our cabinets replaced (oh, about 15 years ago!) I had them built to go to the ceiling just because of that crud. It is much easier to regularly wipe the cabinet doors. 

A possible compromise is open shelving in the eating area like in the image below - reduced crud but dust still has to be an issue.

source • via

I'd love to hear from you on this topic. Open shelving - do you have it or not? Do you want it or not? If you've got it, is it just another chore? Why do you think this trend caught on? 

Previous Posts of Interest


©2012 Ashbee Design, Marji Roy

Saturday, January 21, 2012

Kitchen Drawer • New Idea

I had a problem drawer in my kitchen. Odds are you do too. This drawer is the one directly to the right of the cooktop and has my main cooking utensils. This morning I crafted a new divider system and it is no longer a problem. Take a look....


This is the drawer before I started on the reorganization......


The drawer looks fine but it has one of those one-size fits all drawer inserts and a huge portion of the available space is wasted underneath. My kitchen just isn't large enough to tolerate wasted space!


Take it out and look at the large margins of space that are blocked off.


I considered building a custom wooden tray to maximize usable space but wanted to use a thinner material. After considering and discarding many options I thought of plastic corrugated sign board. 


It is lightweight, thin but strong and washable. It is also easy to cut and I figured easy to assemble using the old stand by - duct tape! I purchased a 24" square of the plastic corrugated board in the sign department at Lowe's. I should have purchased two and had to scramble at the end to have enough material. Cost was about $5.

First I took all the utensils and used them to help me plan the new drawer layout. I discovered that, whereas the old tray had four compartments, the drawer had enough space for six!  This was my planned layout.


Next I determined the depth. Part of the problem with the pre-made unit is they all have unnecessarily low walls, again reducing storage area. I wanted to maximize the depth as well so I measured to determine the maximum height. Here I made a mistake which I discovered later. Read on so that you don't make the same mistake.


The corrugated board was easy to cut using a single edge razor blade and metal ruler.  I worked on my self-healing cutting mat. I cut the board into strips just over 3" high. (Note: It is impossible to take action shots of one's self. You need to imagine my hand directing the razor blade. It was holding the camera instead!)


As I cut the pieces, I tested them in place regularly. I discovered, because the walls were high, I couldn't get the drawer back into its slot. The wheels on the sides need to lift up and over the stops in the rails to reinsert the drawer. Luckily I was checking and I cut a notch out of the back of the four pieces affected. I did leave the front compartments with higher walls though.


I also put all the utensils back in to make sure they were easily accessible. I do want more storage but not at the expense of functionality. Looks good!


I happened to have on a hand a roll of the Platypus Designer Duct Tape in denim blue.  My backsplash is also a similar shade of blue so I used this duct tape. Love it.


First I taped all the joints on both sides.  I made an effort to stay square and trimmed each piece of tape even to the board.


I used some of the scrap board to make spacers to help hold pieces in place as I taped them. The spacers were then removed.


This part took the most time because there were a lot of seams to tape.


After all the joints I also tape the top of all the dividers. I figured leaving them open would just create a crumb catcher.

I cut 45º angled slits at all the joints and carefully fitted the tape in place. It is very sticky and held well but I could peel it off and try again when I wasn't pleased with the result.


Looks kind of like a mouse maze but finished up quite nicely.


I purchased a roll of drawer liner that matched the blue and lined the drawer before inserting the new dividers. Be careful to leave enough clearance in your height if you choose a padded drawer liner.


I put it all together and moved in.  Not a bad way to spend a Saturday morning! I like the looks and I clearly increased storage by a third, maybe more.


Now onto the drawer next to the sink. That one is hopeless, I fear.

Check out the other posts in my Organizing Series

©2012 Ashbee Design, Marji Roy  

This post has been shared at:

Tuesday, January 17, 2012

Kitchen Organizing • Measuring Tools

We have all seen the helpful DIY hook systems for inside cabinet doors for hanging measuring cup and spoon sets. In fact, back on January 4th I showcased them and said it was my project for the week. Well it took a little longer because things always do but today I can say, "Done!" and cross it off the list. Although the goal was similar, my approach was a little different.


Instead of hooks I opted for PVC pipe tubes. My husband read my January 4th post and he objected to the design. He thought the spoons would rattle annoyingly every time the cabinet doors were opened. Since he is our bread baker he definitely gets a say in the design.


He suggested PVC pipe instead and so I explored that solution. I had several design constraints to work within. My baking cabinet is the corner cabinet and the doors are narrower. The four measuring cups wouldn't fit in a row. I am also short and moving things up to a second row would be an uncomfortable reach. Instead I opted to split the measuring cups with 3 on the left and one on the right and keep everything low.  


The process was as easy as it appears but I will include a tutorial because there were some deciding points along the way.

Materials need:
  • PVC Pipe - diameter depends on your cups and spoons. I brought them with me to the hardware store and picked the smallest diameter possible PVC pipe. For my set I needed 1 1/4" diameter for the cups and 3/4" diameter for the spoons. I purchased a full length of each. It was only $2.49 for 10 feet and I figured the remainder was good to have around for some other creative DIY project!
  • Foam backed mounting tape
The Process:

Cut the PVC pipe. I cut my lengths 5 3/4 " for the cups and 4 5/8" for the spoons on the long side. I cut them at 45º angle thinking I might want to screw them into a backboard but I also like the visual dynamics. I did it on a band saw because I am lucky to have access to my husband's wood shop but it could easily be done by hand on a mitre box.


I had thought I would make a solid row of pipes and just use some of them so my original layout looked like this.


I realized this wouldn't work because the spacing was wrong but I made enough parts to experiment with.

After cutting the pipes I brought it all down to the cabinet to test possible layouts. For a temporary setup, I put double stick carpet tape on the inside of my cabinet doors.


I then placed the tubes in location paying attention to spacing. It was clear that I would not be using extra tubes as spacers.


Once I decided on numbers and layout I went back to the workshop and sanded all the rough edges. I wanted the pipes to stay white and after a Google search by David and some experimenting, we discovered the best way to remove the red ink was with a brand new green scrubbie and elbow grease. It has to be new, used ones aren't abrasive enough.


Once they were white and clean,  I attached them to the cabinet door using foam backed mounting tape.


I put a strip about 4" long on the back of each piece and just pressed it into place. My guess is that this is the best method for the curved surface. Time will tell. In just under two weeks the project is complete. And it works well. The cups and spoons don't clattered as the doors are opened and closed yet they are easily accessible, once we remembered their new location!


I am curious to know from others that have tried the hook approach. Do the utensils clatter?


Check out the other posts in my Organizing Series

©2012 Ashbee Design, Marji Roy  

This post has been shared on the following sites:

Friday, March 4, 2011

Tree Ring Cutting Board

Let's drift away from stones today.  I just found this cutting board at Canoe.


Photo- Canoe


The site mentions that these crosscut cutting boards have gone through a special curing process that prevents them from splitting. I'd love to know how to do that because all my attempts to save wood slices have ended with significant checking. That can also be interesting - just not in a cutting board.

Splits aside - I'd love one of these.


©2011 Ashbee Design, Marji Roy

Friday, February 18, 2011

Spice Storage Solution

Select•a•Spice Expandable Organizer racks are a long lasting solution if you have lots of spices. I am having trouble locating them now but when my kitchen was last designed (15+ years ago) the kitchen folks installed absolutely useless spice racks inside the doors. I went on a search for a better solution and found these:


That is a lot of spices neatly displayed. The holders come in strips that have double stick tape on them.  You simply position the strips to best match your collection of spice jars. I first attached them to a piece of white plastic which I then screwed to the door but that wasn't required. It has continued to be a useful solution for years.  

Below is a photo of the opposite door on which I kept the rack provided by the cabinet makers. It is a very inefficient use of space, the wrong proportions for most spice containers and covers a fraction of the useable storage space.


I had a hard time locating my preferred type online. They are by Kitchen Art and I purchased mine at Linen and Things. I did find these two sets at Amazon. The first ones look like my originals but the available photo is quite small. The second set looks like a new type which, because of the design might be even more efficient.


Time to fix that left door in my kitchen.


©2011 Ashbee Design, Marji Roy

Tuesday, February 1, 2011

Extra Kitchen Storage

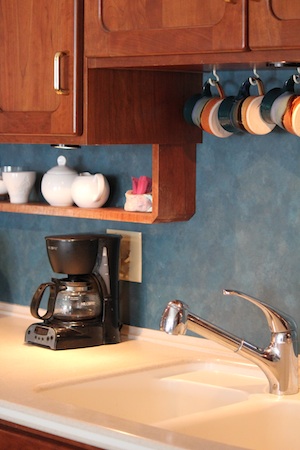
There have been a lot of posts recently in the design blogs about finding extra storage in your kitchen.  I occasionally wonder about cabinet designers not being able to think outside the box. When I had my kitchen redone years ago I requested that small under- cabinet shelves be added.  They thought I was crazy but added them.  They are a great kitchen storage solution.


My shelves are just 6.5 inches high and 4.5 inches deep and they hold so much. I keep things I need easy access to in this often under-used space - salt and pepper shakers, sugar and creamer, assorted teas.  


Although these were made and installed along with the cabinets, one could easily make open-backed boxes out of 1x6 pine or laminate board and screw them to the bottom of existing cabinets. I had them installed under nearly all my cabinets. I did have to select my coffee pot carefully to be sure it fit underneath.  The shelves are also a great place for displaying collectibles. Below is a set of handcrafted pottery mugs designed to look like bent tin cans.


I also had a paper towel holder crafted in the same style and installed next to the sink. There is no doubt about it - this design is a very handy kitchen storage solution.


Saturday, January 22, 2011

The Beauty of Boiling Water

We discovered this design gem while visiting my daughter's in-laws in New Hampshire.  They have this Capresso electric tea kettle that is pretty just sitting on the counter.


But the secret of the design becomes truly apparent once the water begins to boil. Visitors of all ages are drawn to it. We all comment on how a watched pot never boils.  I never realized the beauty of watching a pot boil! Not only a lesson in good design but one in science as well.


Notes:
• The tea kettle is available from Amazon.  
• The teapot is part of my collection of handcrafted pottery.  This one was a gift from a former student back in the '70's. We have been looking for an equally beautiful handcrafted teapot for years.  The proportions and glaze are perfect.  
• The mugs are from the Earth and Sky series from Sunset Canyon Pottery.  We purchased our first few at New Morning Gallery in Asheville, NC then completed the set (and purchased replacements) online.  They come in a variety of shapes and glazes.