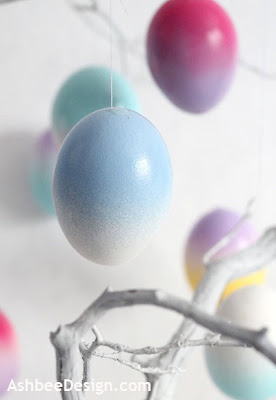
Aren't they beautiful. The very delicate gradation is so appropriate on the fragile, hand blown egg. The exciting part is they are surprisingly easy to make.
There have been years I created eggs that took several hours per egg. Needless to say, I didn't make many of those. I am always looking for the idea that is effective, beautiful and fast. This one qualifies.
Let me share with you the secrets and the steps.
The first secret is spray paint, lightly applied. It leaves a gradated edge naturally.
The second secret is my old plastic lazy susan from the bathroom closet! Huh? Yes, a lazy susan!
Supplies Needed:
- spray paint in a variety of pastel colors.
- lazy susan
- disposable shower cap ( optional)
- play-doh or similar clay compound
- blown out eggs
The Process:
- First you need to have blown the eggs in advance and filled in the ends. I posted the steps for that yesterday in this blog post here.
- Once your eggs are ready for decorating, set up a good spray painting area with plenty of ventilation.
- Take each egg and place it on a pedestal of play-doh atop a small container. I used empty cream cheese containers. Here you see why a true crafter seldom throws things away! I needed 2 dozen cream cheese containers! This arrangement is to allow you space for spraying.
- Place all of this on top of a lazy susan that has been covered. It is important that you can easily spin the egg as you spray.
- I used a disposable shower curtain cap- the kind that are a give away in hotels, to cover the lazy susan. It worked very well. This is only because I "borrowed" the lazy susan from my closet and it needs to go back there!
- As you slowly turn the lazy susan carefully start spraying. Use light coats and aim down from above. The curve of the egg helps created the color gradation by blocking some of the spray.
Side Note: My husband is a sculptor and his studio has a finishing room. It is extremely functional at a time like this. I get to do spray painting indoors with ventilation even though it was too cold outside. Any spray painting is more of a challenge in the north at this time of year.
- As always with spray paint, several light coats are required. Don't spray too much at once or you will get drips.
- I did a variety of eggs. Some are just one color...
- Others I sprayed with one end up, alowed them to dry, and then sprayed with the other end up.....
- Others I sprayed from both sides but allowed some of the white egg to show through in the center.....
I tried a variety of color combinations liking the blue/purple combo the best. I didn't have any spring green spray paint and the collection needed that for a complete Easter mix.
After the eggs dried I glued strings onto some for hanging in an Easter Egg tree...
and others are left without for use in baskets...
and bowls mixed with eggs created in earlier years.
I just like photographing them!
Other Egg Decorating Ideas from AshbeeDesign.com
Denim Eggs - Very Country!
Speckled Eggs in Driftwod Nest
Harlequin Eggs - Using Duct Tape!
Previous posts of Interest
I have shared this post at:
2012 Ashbee Design, Marji Roy


These are my favorites!
ReplyDeleteoh these are just gorgeous! i wasn't planning on doing eggs, but this might have persuaded me.
ReplyDeletethanks for "stopping by my place" today.
Absolutely beautiful!
ReplyDeleteThese are so beautiful! I don't really decorate for holidays, but these have me thinking maybe I should.
ReplyDeleteNikki @ the ambitious procrastinator
What a great idea! No reason why eggs can't be trendy :)
ReplyDeleteThanks for linking it up @ Creatively Living!
--Katie
I love this idea. I found you through the linky party and am your newest follower. These eggs are some of the prettiest I have ever seen. I used to do hand painted ones that took forever, too. What fun these will be-xo Diana
ReplyDeleteThe joy is that they are quick and easy. What more can we ask for? Make some and enjoy! Thanks for visiting.
DeleteThese eggs are BEAUTIFUL! I am hosting my very first linky party this weekend called Dare to Share. I would love it if you could link your gorgeous Easter Eggs.
ReplyDeletePam from http://pamspartyplanning.blogspot.com/
These are so absolutely stunning! We love them so much we want to feature them on our blog (with a link to your site, of course!) Thank you for the amazing inspiration! Keep it coming!
ReplyDeleteWarmest, Liz and Lo
{celesteandpearl.blogspot.com}
And so you want to color Easter eggs, nevertheless, you tend not to need to take the time to decide precisely what plant does precisely what in addition to the length of time every requires. This really is rather usual, in particular per day in addition to age group in which all of us simply lack any time to look at very much plant life in addition to have tried them as a way to produce your Easter eggs. As an alternative, you should buy an easy ovum equipment in the retailer and then check out color the eggs efficiently! crosswrods solutions
ReplyDeletenice
ReplyDelete