Friday, December 27, 2013

DIY Christmas Card • 2013

I again continued my tradition of hand-crafting my annual Christmas Card. The design for 2013 shows my increasing exploration of the possibilities with a Silhouette cutting machine, combined with my most frequent subject matter - the Christmas Tree. Save this as an idea for 2014.


I used a classic accordion card construction and combined it with a bezier curve tree I sketched in the software. It is cut from two pieces of card stock, that when glued together, create a 3-D self-standing card.

I also used a contemporary font to cut the message and the year into one layer of the card stock.

I mailed it in an evergreen envelope with a shorty Christmas letter on a red insert. I did mail all 70 of them on Monday, Dec. 16th but have learned that many on my list hadn't received theirs by the 25th. US Postal fail!


**********
© 2013 Marji Roy, Ashbee Design

Sharing this post at some of these link parties. They are worth checking out for other ideas.

Thursday, December 26, 2013

Contemporary Holiday Tree

Each year I, like very other blogger, decorate my front door area for the holiday. And I too get over-whelmed with holiday prep. Understand that is not a complaint. To me Christmas is very much a season, a season of prepping, sharing, giving, loving, remembering. I recently read that one way to reduce the stress of the holidays is to view it as a season and not just a day.  So true. So because this is a season, several of my holiday posts will be appearing after Christmas Day. I realize I won't inspire you this year, but possibly, you'll find it next year and I'll inspire you then.  So, here is your first idea for Christmas 2014!


I have a wonderful front portico. It has entries to both the sunroom and the family room but it is on the north side of the house and has a dark corner. For many years I have made evergreen arrangements for that corner but they get lost in the dark. This year I started thinking white stars, lots of them!

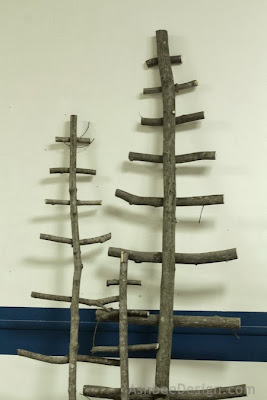
I then built 3 tree forms from saplings on which to display them. These saplings were cut from our property along the roadside where they need to be removed before they impact the power lines above. (That statement is to prevent the comments about how un-green it is of me to cut a live sapling. Many need to be cut!). I choose thin wispy ones about 10-12 feet high. The base became the tree base and then I cut cross pieces, each slightly smaller and thinner from the rest of the tree.

I snapped a few iPhone photos as I built the trees -


I pre-drilled a hole through each and then used drywall screws to attach them to the upright.

I made three tree bases in three different sizes. 

I connected the bases of all three with brown dowels at 2 levels to hold them in a triangular position and to be a self-standing trio of trees.

I also stacked some polystyrene and cut out about 75 stars in 4 different sizes with holes drilled in the top of each.


I added a red ribbon and positioned 1 star on each branch of each stick tree. A dab of hot glue holds them in place.


And then placed them in my portico to welcome family and friends to our home this holiday season.


Here is that same corner last year with the Christmas ladder. The ladder was much easier to make but because I had used it for 12 months I needed to try something new.


And here is the 2011 version.....


**********
© 2013 Marji Roy, Ashbee Design

Sharing this post at some of these link parties. They are worth checking out for other ideas.


Monday, December 16, 2013

DIY Swedish Tomten

I am part Swedish and for my entire life I have been wearing clogs and loving tomte. I have posted about the little Swedish elves before and you can read about their history here. In nutshell they are temperamental house helpers that, in modern times have become associated with Christmas due to their red hats and beards. I have a collection of them and they appear in the nooks and crannies around our home for the holidays. I have been wanting to create my own and this year I decided my annual hand-made Christmas ornament would be a tomten.

They come in all shapes and sizes with wonderful personalities but my favorites are the ones that are buried in their beards and hats, so that is the type I crafted.


Tutorial:
Here are the steps for making this quick, fluffy tomten tree ornament.

Supplies needed:

  • Wooden ball 2" in diameter
  • Wooden ball 1/2" diameter
  • Red felt
  • White fuzzy yarn ( note I made 7 tomte with 1 skein of yarn)
  • Stem Wire
  • 1/8" red ribbon
  • Thread, needle
  • Glue gun and glue sticks
  • scissors
  • sewing machine - optional
  • Drill and bit - about 7/64"
  • 5 minute epoxy
  • Scrap chipboard 3" x 6" - cereal box cardboard is fine


Procedure:
  • Make the hat.
  • Cut pie shaped pieces of red felt. For a 2" wooden ball it should be 7" long on each of the sides and about 6.5" along the diameter.
  • Stitch up the 7" side seam to make the hat. Sew close to the edge. If you don't have a sewing machine you can experiment with felt glue.
  • Turn the hat right-side out and fold up the front rim about 1/4". Use hot glue to glue up the front rim.


  • Using a small drill bit ( I used 7/64) drill a hole into the wooden ball at and angle. You might need a different size depending on the size of your stem wire. 

  • Cut a length of stem wire about 7" long and glue into the hole. I used 5 minute epoxy.


  • Fold the cardboard in half so it is double thickness and about 3" x 6".
  • Wrap the fuzzy yarn around the cardboard form 70 times.  This amount might have to vary depending on the thickness of the yarn you use. My was thin.


  • Take an additional piece of the yarn and tie all of the loops together tightly.


  • Slide the yarn bunch off the cardboard.


  •  Use sharp scissors and cut through the bottom loop of the yarn bunch so it opens up with the knotted string in the center.


  • Place a blob of hot glue onto the wooden ball about 3/4" in front of the wire stem.


  • Place the knotted center of the yarn bunch on top of that glue blob and press in place.


  • This knotted spot should be at approximately the top of the head. It will be covered by the front of the hat which will go over the wire stem.
  • Spread the hair out to either side and put a glue line from side to side about where his smile would be.


  • Pull sections of hair around to the front and attach to this glue line. 
  • You want the entire front to be well covered in fuzzy yarn.
  • You don't have to be very fussy but you do need good coverage. Add glue if needed.


  • Repeat the same thing on the back side about 1/2" below the wire stem.


  • You may need to apply a little on each side as well.
  • Study the ball and look for areas not covered and use glue to attach some yarn there.
  • The ball will look really wild at this point.


  • Slide the hat over the stem wire with the seam on the back-side.
  • Cut the wire if it is too long.
  • Place a dot of hot glue on the top of the head and glue the front brim of the hat there.


  •  Add another dot of glue beneath the back rim and glue the hat there.
  • You can add dots to each side as well.


  • Bend the wire inside the hat to give the tomten a unique character.


  • Put a dot of hot glue right below the folded brim on the front and......


  •  Attach the 1/2" wooden bead as a nose.


  • Now, working over a wastebasket and using sharp scissors, start trimming your tomten's beard and hair. This starts to tame the wild appearance. I was aiming for a well rounded bottom edge. I also found it helped to shorten hairs round the nose.


  •  Make a loop of 1/8" red satin ribbon and stitch it by hand to an appropriate spot on the hat.


  • And then make some tomten buddies and hang them on your tree........


Merry Christmas to all!


**********
© 2013 Marji Roy, Ashbee Design

Sharing this post at some of these link parties. They are worth checking out for other ideas.


Thursday, December 5, 2013

Red and White Christmas Tablescape • Reindeer and Sleigh

I designed a contemporarily styled reindeer Silhouette cutting pattern. When I designed it, I pictured it in my mind made in all white and paired with a sleigh full of gifts. Because all white items don't show particularly well on the Silhouette store, I first crafted the grouping in more traditional colors. I still knew it would be stunning in all white, and that's what I wanted for my table. I finally had enough time to assemble another set, and this morning I photographed it to share with you.


I think my 4 1/2 year old grandson will love it! I do.
It is the first Christmas decorating for me this year.  I hope to do a little something every day or two, and then be all set to start baking cookies and put up the tree when the kids and their families arrive the weekend before Christmas.

For those that are interested in a more traditional paper choice, here is the photo of the other set.


If you are interested in making your own, I have a complete tutorial on my other blog. In fact there a three separate tutorials and three separate cutting files.

  • The tutorial for the sleigh is here. Cutting file for the sleigh is here.
  • The tutorial for the reindeer is here. Cutting file is here.
  • The tutorial for the presents is here. Cutting file is here .

Have fun crafting. It is part of the joy of the season.