Showing posts with label DIY. Show all posts

Saturday, September 19, 2020

 How long have you been following Ashbee Design? Since 2011 when I started? If it has been a lot of years you will know that each year I design and make my own Christmas Card. Even during these years of declining Christmas Card sending I still do it. And I often share the ideas here- generally not until the following year. I have abandoned that trend. If you are on my Christmas Card list and don't want a spoiler - stop reading here.

Otherwise....

2020 will be another zig zag card following on the two previous years. I have just uploaded to my website the Zig Zag Presents Christmas Card.

It is a great crafting design because it is so customizable. All the wrapping papers are from my stash of craft supplies. What is in your stash? If you want to try using some of it up on this design download the cutting file here for $2.99. The easy-to-follow assembly tutorial is online here.

Have you realized yet that this file can also be used as a birthday card? Just use different papers!

And the download comes with a template for making the perfect envelope. It has been designed so that you can also use a standard 6 x 9" booklet envelope. If you are making a lot of cards to send you might prefer that option.

Be sure to share photos of your versions of this design with me at marji@3dcuts.com on in the online facebook crafting groups.

Happy crafting,

Marji


Wednesday, July 29, 2020

Easy Rider Shadow Box Series

David and I are loving our e-bikes and spend hours on beautiful days exploring the hilly and forested terrain of Connecticut. I have been thinking about shadow boxes that feature the experience of riding but not just e-bikes - any type of bike and from that idea grew my new Easy Rider Shadow box series.


My first design was created from tracing photographs of David and myself on our e-bikes. We took the photos and I imported them into Illustrator. I traced the outlines carefully and used that tracing to create the silhouettes. Even though they lack detail they clearly look like us.


I then continued with this concept to make a file that allowed the crafter to insert any of 4 different riders into the scene.  The download comes with a male cyclist, a female cyclist, a single guy on a motorcycle and a couple on a motorcycle all cruising through the mountains. 


The download includes all four riders and and the individual layer 1 needed for each. You can easily swap in the rider you want to make. 


The download file is here. It is $4.59 for all four files together.

The online tutorial is here complete with a video showing the easy assembly process.


Monday, January 28, 2019

Going Square!

Crafters requested and I listened. A number of you have requested that I offer some of my Star Shadow Boxes in a square format.  People want to put them in wooden frames behind glass in order to make a lasting keepsake.  I spent the past two weeks re-desgingin the Heart Tree Shadow Box because Valentine's Day is approaching and it would make a great gift for a significant other.
The shadow box is 11" square and designed to fit into the standard one available from Amazon.com. I have also incorporated strings lights that come with a remote control also from Amazon. Links to the supplies are included in the tutorial.

I also added three sets of couples to this download. It comes with a male/female couple or  male/male or female/female groupings. You choose the one that matches the couple yo are featuring. And as with the original star shadow box, the letters carved into the tree are customizable.


Time for a new project?  
  • Cutting files here: http://3dcuts.com/illuminated-shadow-boxes/heart-tree-square
  • Video tutorial here - http://3dcuts.com/heart-tree-square-shadow-box-tutorial


Happy crafting,

Marji
©2019 3dcuts.com

Friday, January 11, 2019

Valentine Garden - a new DIY Valentine design

Valentine's Day is in February which smack dab in the coldest, snowiest part of winter here in New England. I decided to incorporate a little springtime cheer with my Valentine design this year to helps us weather through until April.
My Valentine card uses the garden theme to brighten the dreary winter days. This design is based on the same construction concept as Zig Zag Village although a whole lot quicker to assemble because it doesn't have the fiddly details. And yes, it does fold flat for storage or mailing. It fits into a regular 6 x 9" booklet envelope.
Available in svg, pdf, png, and dxf formats here:http://3dcuts.com/heart-valentine-projects/valentine-garden

Assembly tutorial is here: http://3dcuts.com/valentine-garden-tutorial

And here is a quick link to the tutorial:

Happy crafting everyone!

Marji
3dcuts.com


Tuesday, October 9, 2018

2018 Additions to Tea Light Village.

I have been creating buildings for Tea Light Village since 2014, and each year I seem to design 2 more. 2018 is no exception. I have just added a Barber Shop with iconic pole and a Covered Bridge with a horse-drawn sleigh to the store at 3dcuts.com.


Both are great additions to this charming village.

The covered bridge reflects some of the design elements you will find a various bridges around new England. The sleigh comes with driver and a tiny tree for the back.

The barber shop file includes a bench, picket fence, and a pine tree.

Download links:
  • 2018 Additions: If already have Tea Light Village buildings up through 20717 then you can add the 2 new files for $2.59 here.
  • 2018 Complete: If you don't have any of the village you can get all 16 buildings in one download for $12.59 here.
  • See all the available download options here.
  • Barber Shop assembly tutorial is here.
  • Covered Bridge and Sleigh assembly tutorial is here.
Which will you make first?

Happy crafting everyone.
Marji
3dcuts.com

©2018 Marji Roy


Tuesday, September 18, 2018

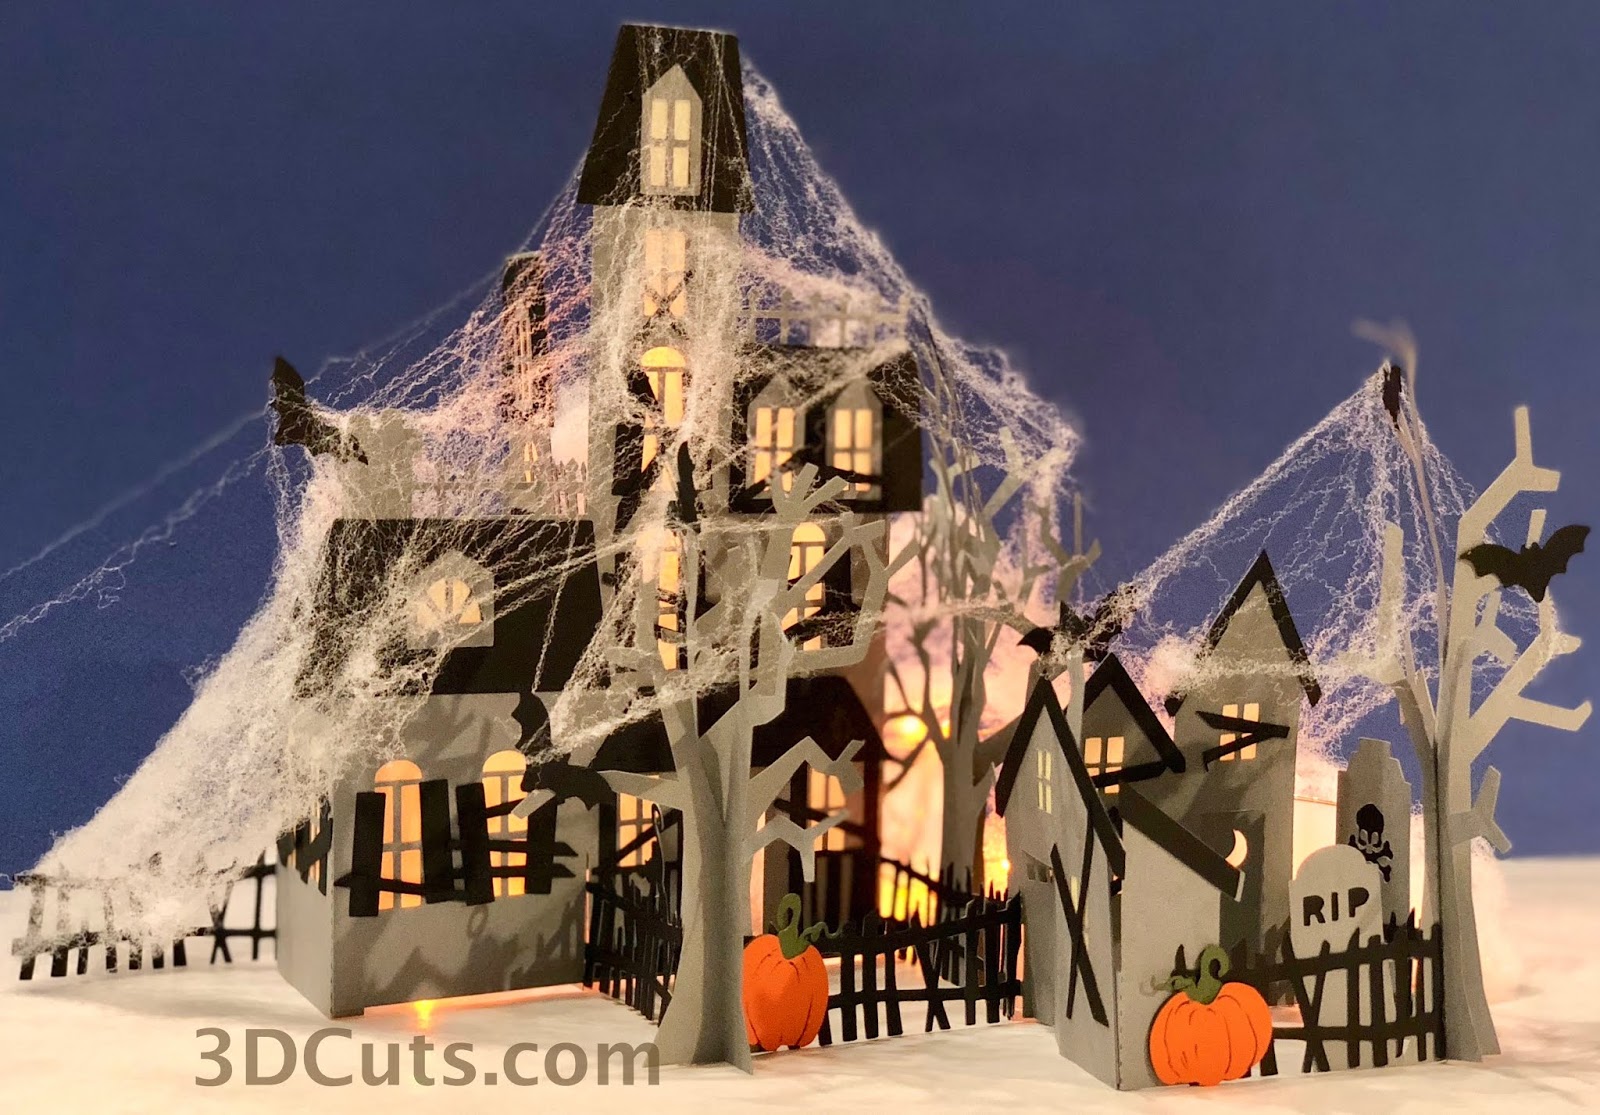
Haunted Zig Zag Village

Yes, this is natural extension of my first and second versions of Zig Zag Village. Here is the Haunted Mansion version. It is complete with cats and bats, and pumpkins. Included is a haunted graveyard and outhouse. Pair the card stock mansion with some webbing and orange LED fairy lights and it becomes  spooky, fun Halloween decor.

Center


Pair the card stock mansion with some webbing and orange LED fairy lights and it becomes  spooky, fun Halloween decor.


The cutting file is available here:  http://3dcuts.com/zig-zag-village/hauntedThe detailed tutorial (including a video) is herehttp://3dcuts.com/zig-zag-village-haunted-tutorial 


Happy Halloween everyone!


Sunday, August 12, 2018

Zig Zag Village - It folds up!

Fellow crafters - It is never too early to start our Christmas crafting. Yesterday I released a new project that will get you started if you haven't already.

Check out my new Zig-Zag Village. I designed this because so many people have commented on how they love Tea Light Village but don't have storage space. I wanted to design a village that folds flat. And Zig Zag Village does just that! Of course this opens up the possibility of mailing it as a gift so I designed it to fit in a standard 6" x 9" booklet envelope.

The village is filled with charming details like window and door frames, porches and Christmas Wreaths. You can light it with standard LED tea lights or there are included bases for installing LED fairy lights.  Directions for all of it is included in the online tutorial which is complete with video assembly instructions. And below is a short video showing the ease of the folding.


Happy crafting everyone!


Friday, June 8, 2018

Hummingbird Shadow Box

I am still loving shadow boxes. I think my fascination with them started with one of those German kitchen wooden shadow boxes that always hung on the wall in my home growing up. I still love them.  My latest shadow box includes a hovering hummingbird sipping nectar from the flowers.


My designing is a little more stylized this time. I have been skipping around with the bird themes. Some trend more toward realism and others are more stylized. You certainly can change the visual impact by using different papers in the back. I used a pearly pink that I had in my stash. That paper made it clear that the birds and flowers would be simple black and white.

The construction techniques for this shadow box are basic 3D skills. I have made a step-by-step video tutorial to show you how to assemble it.

Here are the links to the resources for this fun project:
Download the cutting file here: http://3dcuts.com/3d-decor-items-assorted/3d-star-light-pillars-7-sizesView the tutorial herehttp://3dcuts.com/star-light-pillar-tutorial

Monday, March 5, 2018

Easter Card for Paper Crafters

I use a Silhouette Cameo Cutting machine for my paper crafting and I design all my own files using Illustrator.  I have a sister site 3dcuts.com were I sell these files to other crafters.  And at this site every download comes with the file in SVG, PNG, DXF and PDF formats. That is because ANY paper crafter can make these files.  Here is my latest file design as a 3d Easter Card that can fold flat for mailing.

This file can be made using a Cricut or a Brother ScanNCut but it can also be cut by hand using and exacto knife.  Yes it takes longer, and it takes skill but many people do make my files with out the cutting machine.

In each tutorial I provide links for folks with other cutting machines to help in the prep of files.

  • For the Silhouette: The SVG files from this site will need to be turned into cutting files. Click here for detailed steps on how to use SVG files on your Silhouette. http://www.3dcuts.com/tutorial-upload-svg-silhouette
  • DXF files can be opened in the basic edition of Silhouette Design Studio but often require modifications. I recommend using the Designer Edition and using svg files.
  • For Cricut ExploreHere is a guide for importing into Cricut Design Space.  http://www.3dcuts.com/tutorial-adding-3dcuts-files-to-cricut
  • For Brother ScanNCut: The svg files will need to be transferred to files for your particular machine. You can change SVG files to FCM files at  http://www.canvasworkspace.com/ or Google "How to import SVG files into a ScanNCut" for links to tutorials.

And, after cutting, there is can easy to follow tutorial for the assembly.


Saturday, February 24, 2018

Calligraphic Kitties

I have been playing around with an Apple Pen on my iPad. I was working to create animals with simple lines. In the end I had to switch to Adobe Illustrator on my computer but I did successfully create a series of sketches. The first batch is of kitties and I created the following 4 files:


The possible uses of these are many. I have never used vinyl but I would love one of the mandala designs on a t-shirt with real bows stitched on. Attempting a vinyl project with my Silhouette is still on to to-do list. I know I should but I am a paper crafter at heart. And so with paper I first made a shadow box with the mandala.


And then I made a series of note cards. The creative possibilities here are endless. I'd love see what you can do with your paper stash to create some greeting cards with these files.


Also check out the video I made giving hints on creating the shadow box.


Friday, January 26, 2018

Shadow Box Video Tutorials

It has been a long time coming but finally.......I put aside the time to learn how to make video tutorials. To date I have completed three.  The first was a little one for a simple project for Valentine's Day.  Check out this tutorial on the Cube Heart Shadow Box. This shadow box can folded flat and be mailed!


Then I got brave and created a video (well actually four) of the steps for assembling my new Heart Tree Star Shadow Box. This is the most complex paper crafting project I have designed but it has some neat engineering in it to help others also create it....and that is so much easier to demonstrate in a video.


An exciting special note on this video is that it also applies to the Deer in the Forest and the Horses in the Pasture Star Shadow boxes. I used the same techniques in all three.


And, although the timing is certainly a little late, I just uploaded the video tutorial for the Star Nativity Shadow Box as well. Maybe you are inspired to start prepping for next Christmas!


Interested in any of these projects? Here are quick links to the cutting files and the tutorials
  • Illuminated Star Show Box cutting files here.
  • Heart Cube Cutting File here.
  • Deer Tutorial here.
  • Horses Tutorial here.
  • Heart Tree Tutorial here.
  • Heart Cube Tutorial here:

Happy crafting!
Marji
3DCuts.com
©2018


Saturday, November 18, 2017

Christmas Crafting Time is Here!

Christmas crafting comes a little early to my craft room because I have to get designs out for others to make in time for their holiday decorating.  I have just released the cutting files for 3 new tree ornaments. These are loosely inspired but Polish Folk art. There are 3 different ornaments all similar in design. They each use the curled paper as a 3D element but all can be stored flat!


I also completed the same files in a festive color scheme. Any coordinated pairs could be used so you can customize it to match your Christmas Tree color- scheme- if you have one.


I also spent some time re-doing some old files that were only available in the .studio format through the Silhouette Store. New on the 3Dcuts.com site this holiday season are a couple of my earlier card designs.

And a contemporary classic of mine is the HoHoHo trees for table decor. Again new to 3dcuts this year but previously available on the SIL store.


All of these are available on the Christmas Theme page at the 3dcuts.com website here.

Happy Holiday crafting everyone!
Marji
©2017 Ashbee Design, Marji Roy


Monday, October 23, 2017

Additions to Tea LIght Village

Although it is only October, those of us in the crafting world are moving onto Christmas. And every Christmas I add to Tea Light Village. I started this series in 2013 and it has just gotten better every year. This year it is arranged on a mantle.


There are two new buildings for 2017 - a Tudor House and the Clock Tower Library.
The house has the off-center dormer and curved door as Tudor characteristics. And the Clock Tower adds another municipal building to the village.  The cutting files for these are available at 3dcuts.com here.

This year I have also solved the lighting issue. If you have been building the village right along you have learned that turning 14 different tea lights on and off is a real bother. It was for me so I tend not to light up the village. It really is much prettier when lights are glowing out the windows. So I spent some time thinking about it. What I really wanted to do was use the remote control string fairy lights instead. They all turn on with one press on the remote button. Easy! But I don't like seeing the wires and stray lights between buildings. So I designed a solution.


Available now is a hexagonal base system.  You cut the bases you want for the village you have created, attach them together and run wires through the base. It is quick and easy. It creates multi-levels for display plus plenty of room for the wiring. The bases come in 6 depths plus 2 shapes and are available here.

I have a complex village with 16 different buildings. Here is the underside of the hexagon bases showing the wiring of the fairy lights. It was very easy to do and I have put together a great tutorial for you to also upgrade your tea light village.

Using these nifty strings lights available from Amazon (link below) you can improve the lighting in a number of ways.
  • All lights are operated by 1 switch.
  • The switch is a remote for easy access.
  • Flickering is a choice. I disliked the tea light flicker. It made me think of houses on fire.
  • You can control the brightness. If the room has other lights on, push the brightness. If the room is dim, reduce the brightness.
These are all huge pluses for me.
Here are the links to these files:
  • Complete 2017 Tea LIght Village - $10.59 - Buildings only here.
  • 2017 Additions - Tudor House and Clock Tower Library - $2.59 here.
  • Hexagon Bases - Not incllude in the complete set - $3.99 here.
Here are links to the tutorials for these additions:
  • Tudor House Tutorial here.
  • Clock Town Library here.
  • Hexagon Bases and Wiring here.
And here are links to the supplies I use for this project.

Definitely time to start craft for Christmas!

Enjoy everyone.


Tuesday, September 19, 2017

Star Shadow Box - Deer in Forest

Last week I finished a new Star shaped shadow box. It is a perfect fall theme of deer grazing peacefully in the forest.

I am quite excited about some of the new discoveries. First I re-engineered the inside stacking system. It makes it much easier to assemble - although there are more parts. And instead of tea lights I used LED fairy lights. For one thing, they don't flicker but they are also tiny and malleable. Lots of possibilities there!


©2017 Marji Roy, Ashbee Design, 3dcuts.com


Wednesday, June 21, 2017

Musical Mandalas

Here is a new series of Mandalas I designed combining the graphic elements of musical notation with various Illustrator tools. I love the impact of these striking circular designs.

I mounted them on a  deep red background and displayed them in Michael's Benton Shadow Box frames.


I created 4 different signed based on the g Clef, 1/16 note, 1/8 note and quarter rest.


The cutting files are available here: http://3dcuts.com/mandalas
and assembly hints and tutorial is here: http://3dcuts.com/musical-mandalas-tutorial

Happy Crafting! Marji

©2017 Marji Roy, Ashbee design, 3dcuts.com


Monday, May 29, 2017

Aspen Silhouette

Years ago one of my first silhouette projects was a 4 part birch tree silhouette. I love that design and was recently approached by a design firms to re-do it as aspen trees. They were looking for a design to use as a wall mounted metal silhouette sculpture for the outside of a building and they especially liked my birch design. They hired me to adjust and modify the birches using the signature little triangles and create an aspen design. That project is done - but I did retain the rights - so I have adjusted it, made it two levels and put it in a paper frame for paper crafters to make on a much smaller scale.  I recently finished the 3D Aspen Shadow Box design.


This shadow box can be created with no back ground letting the color of the wall show through or with a inserted background of either a photograph or solid colored paper. In the design on the left I  inserted a photo I snapped in the Great Smokey mountains a couple of weeks ago. I just opened it in Pixelmator and cropped it into 4 squares to fit.

This cutting file is available for purchase ($1.99) including the jpg photos at my web site here:
http://3dcuts.com/shadow-boxes-nature-themes/
The online tutorial for assembly is here:
http://3dcuts.com/aspen-tree-shadow-box-tutorial

Back to the design commission.....I don't know where the building will be located that will have a forty foot tall version of this design on its outside wall but based on the communications I have been told it will be a motel. I also know the project name has Durango in it so I am assuming next year some time (2018) this might appear in Durango, Colorado. If anyone sees the final install please snap a picture and send it on to me.

Thanks! Marji

©2017 Marji Roy, Ashbee Design

Saturday, April 29, 2017

Making Mandalas

Did you love the Spirograph toy when you were a kid? I certainly did - and that is the basis of my most recent series of designs.


I got hooked on creating mandala designs based on spirograph type images - and then I expanded from there.


I spent a couple of weeks creating all kinds of designs, cutting them and experimenting with them. I took four different ones and framed them in Michael's Benton 9x9" shadow box frames (they were on sale at 60% plus 15% off!) to hang on my craft room wall.


These mandalas are all cut from card stock using my Silhouette Cameo using paper in gradated colors. I chose a blue series to match the wall but this would work in any color gradation series. I have finalized 1o different designs which are available here on my store at 3dcuts.com. Here are the 10 designs currently available.

Some of the designs are a single star pattern made of 3 layers, others are more complicated. One is two layers of stars each made up of 5 layers of card stock in different colors.


Important Links 
Files are available here.
Complete online tutorial is here.

Other Options:
Once you start cutting these open your creative mind and think of other applications. Here are two possible uses for the same files - even consider vinyl!


And I have added a freebie to my freebie page. Go here if you want to test your machines file compatibility or skill at cutting fine lines.


©2017 Marji Roy, 3dcuts.com, Ashbee Design