Showing posts with label Furniture. Show all posts

Wednesday, May 25, 2016

IKEA Kura Loft Bed Hack

Time for another Gramzee IKEA hack. My grandson just got an IKEA Kura loft bed for his room. He needed more playspace and the lofted bed provides that but it also creates the opportunity for a neat hiding spot. There have been lots of different posts on how people have enclosed the space but I made an important discovery for this treatment.......


I used a standard fabric shower curtain 60" x 72" for the fabric. It was just about the perfect amount of fabric. Amazon has so many neat shower curtains and this space themed one was perfect for a seven year old boy.  And it cost only $20!
  • I cut the shower curtain in half horizontally and sewed velcro to the top of each half. 
  • I attached the other half of the velcro to the bottom edge of the bed. I used double stick carpet tape and then a staple gun to attach this.
  • The top half of the shower curtain fits across the large opening in the front.
  • The bottom half fits along the base and wraps around behind the ladder.
  • I then pinned up the bottoms and hemmed them to fit. 
  • I also created a slit door in the middle of the front but I don't think that was necessary.
Quick, simple and perfect for Taylor!

©2016 Marji Roy, Ashbee Design

Tuesday, October 13, 2015

Refinishing an Old Favorite

I know. It has been a long time and several of you have been inquiring as to what's up. Thank you for caring. I am fine, just very, very busy. And a major part of that was a complete re-do of my husband's website and blog in a new software. It got to be too much to maintain three different websites with three different softwares. I now have both my husband's Wood That Works website and my 3DCuts website in the same software, so I can again think about this blog. Only two different web software packages now.

But I have done a variety of projects and have photographed some of the process so let me share. This one has me excited today because...... one of my big projects is a complete re-do of my office craft space. That project will get a post of its own but this is a mini part of it.

Years ago (maybe as many as 30. We can't exactly place it in time.) my husband and dad, were together out exploring houses, and discovered this drawers unit.

It is handmade from wood with 36 little drawers and it was white with yellow naugahyde sides.  My husband negotiated a deal and this piece became ours. As a functional unit in an office it is wonderful. Years ago I had painted it forest green to cover the yellow always planning to refinish it. But I never found the time. Until now.

I am having cabinets installed in my office but I designed the new layout to still include this drawer unit. But there is no denying the fact that it is ugly but I believed it was beautiful underneath. Others wondered. So I attacked it with stripping chemicals.


First I removed all the brass hardware. I set up outside to allow for penalty of ventilation and applied Zip-Strip. This paint clearly wanted to be off this unit. It just bubbled up and was easy to scrap off.


I then sanded all the drawer fronts to remove any remaining paint.

I applied three coats of polyurethane and just watched the beauty of the wood grain shine through the drawer fronts.

All the brass hardware was cleaned and polished and then covered with lacquer spray.


I reattached all the hardware.

Meanwhile I painted the drawer unit a satin black.  I wanted the combination of the wood, brass and black.  There will be a bit of an industrial flair to my new office.


The finished unit is such an improvement.  The sides and top are still painted Naugahyde. Those will be encased in the new cabinetry. Just the drawer fronts with satin black frame will be visible.

Progress is being made daily on the office redo. I expect this piece will be installed by week's end. More photos to follow.

My daughters are now fighting over who will inherit this piece!

©2015 Marji Roy, Ashbee Design


Friday, August 16, 2013

Wanderings • MAD in NYC

David and I made another visit to NYC recently to install one of his sculptures in a corporate office in the city. While waiting for the paint to dry we made a dash up to the Museum of Art and Design at Columbus Circle.  This museum is a favorite stop of ours because it focuses on Craft in America.  One of their current shows is "Against the Grain", an exhibition featuring works in wood in contemporary art, craft and design.  As with any NYC show, there were items that absolutely wowed us and other things we questioned. Here are a few photos of some of the spectacular work. I apologize for the iPhone photos. I was surprised we were allowed to photograph at all!

Wood Turning by Bud Latven, 2007

Facecord, a dresser by Mark Moskovitz, 2012


Enignum Shelf by Joseph Walsh, 2011


Two for Tango, Fontainebleau Suite by Pablo Reinoso, 2012

A Skeuomorphic Wing Chair by Martin Puryear, 2012

Wooden Textile Walnut by Elisa Strozyk, 2011


The show is open until September 15, 2013.  Well worth a visit if you are in NYC.

©2013, Ashbee Design, Marji Roy

Friday, May 10, 2013

Live-Edge Desk • DIY Tutorial

Yesterday I shared with you the photographs of our recently completed desk for David. It is a funky, beautiful piece of furniture and it was easy to make. Today, I'll share with you how we did it. It can be done with hand power tools!


Design considerations:
Our goal was to create a functional surface for working with two laptop computers at once. David wanted it counter height so he can stare out the windows as he designs. We knew it was going to be located in the kitchen area which serves as the office space for his gallery/showroom. The space is small yet functional and the desk, which is visible from the gallery needed to be a statement piece unto itself.

The actual design of this piece was then dictated by the incredible slab of live-edge birch we found for sale at a nearby Woodcrafter's Supply. Luckily we have a pick-up truck!


The slab was rough sawn. That means that hours of sanding would be required to make this into a piece of furniture. Here you can see the saw marks across the grain of the wood.

We don't have access to a planner and we also wanted to leave the character of this slab intact. We set up the slab on two folding tables in the garage and I started sanding with the belt sander Dave gave me as a birthday gift last year. DIY'ers like unusual gifts :-)!

I sanded in two hour sessions over several days. I smoothed out the worst of the saw marks with 50 grit paper and then repeated it with 80 grit paper.  I sanded both sides.

The edges still had some sections of birch bark which I chiseled off and then I also sanded the edges trying to preserve the character including bug trails.


I switched to the hand orbital sander and continued sanding with 120 grit and then 220 grit sand paper. It smoothed out beautifully but I was shaking in my dreams once complete! It took hours and hours and hours of sanding!


Next, using a skill saw and a guide board ( forgot to take a picture) we cut one edge square and cut off a section for the support leg.  We knew the height we wanted. We then needed to put the desk in place to determine length and best direction of the slab.

David helped with all steps requiring moving the planks around. They are VERY heavy! He attached a temporary 2x4 to the wall as a bracket. We had some choices about location on the wall and wanted to know where the studs were.


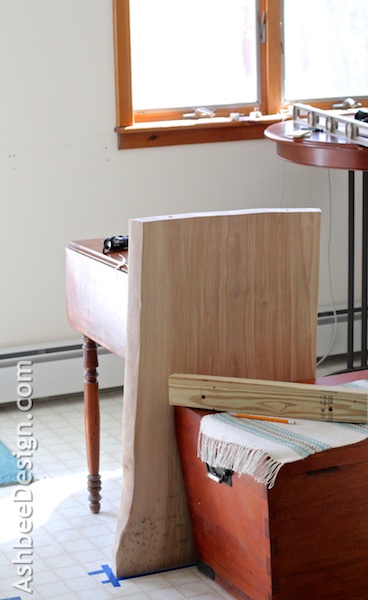
First placement! It is all balanced here. We determined that another 6" needed to be cut off for best sizing in the space. We also determined the desk looked best with the notch facing out and the sides tapered down. The slab has a significant twist to it that needed to be mitigated with positioning.


We crafted a marking tool to help us cut the top of the support leg to match the bottom of the slab. We needed to match the bow. This tool is a small dowel with a nail through it. It scored a cut line along the leg.


We debated about using a hand-held saber saw or the band saw to cut the top of the leg. Either would have worked. We opted for the band saw to reduce sanding but you could easily choose the other if you don't have access to a band saw. We created a support structure using a rolling cart and a stack of cardboard to support the weight while cutting.


Meanwhile, David created a custom wall support in place of the temporary 2 x 4. This was made out of three matching lengths of 1 x4 pine stock glued together.


We used the miter saw to square up the ends of the wall support. Holes were drilled through this block from top to bottom for threaded bolts to slide into. On the bottom David drilled large holes to allow for a recessed nut. This system would hold the desk tight to the wall.  You'll notice this desk has no cross supports. We are relying on the rigidity of the wall and the weight of the pieces to provide the needed cross support. (Again, I forgot pictures but if you scroll down there is a photo of the finished wall bracket.)

We needed to start worrying about keeping things square and level. We created a support system using odd pieces of furniture to hold the base square and in place.


Next we added standard adjustable feet to the bottom of the leg. These little fellas allow for later corrections and small adjustments plus keep the wooden leg up off the floor.  This helps in cleaning.


We decided to attach the top to the bottom with threaded rod epoxied into place. Dave put little nails with the tops snipped off into the center of the hole locations on the base and then we lowered the top in place. This marked the center of the holes on both pieces. Dave drilled holes into the bottom of the top and into the top of the base using a jig to keep square.

The holes are designed for a 3/8" threaded rod to slide in. We tested the holes, making sure it fit together.


David used 5 minute epoxy to glue the threaded rod in place. At the wall end, the threaded rod was glued into the bottom of the top slab. At the leg end, the rods were glued into the top of the leg.


Once the glue dried we once again tested everything. Yes! We could get it all in place and it was strong. We applied glue (5 min epoxy) to the leg end threaded rod and added wood glue to the wood surfaces. We lowered the slab into place for one final time and allowed the glue to set.

And finally it was time to poly. Although I love an oil finish on wood, I am too practical to want to live with it.  This is a desk in a kitchen. Low Luster Benjamin Moore Polyurethane was our choice.  

We needed to paint the pine wall bracket to match the wall so we temporarily repositioned the desk, painted the bracket Navajo White and I polyied the desk. We had been patiently waiting for this moment. We knew this particular piece of wood had a beautiful wood grain, and we knew finishing it would accentuate it. We were excited to see how much. Yes, the poly did a wonderful job in increasing the beauty.


All sides of this plank were finished. It is just as beautiful from the bottom looking up.


Here is a photo of the wall bracket. The visible holes are screw holes for attaching it to the wall right into the studs. What you can't see are the vertical holes that have the threaded rod. Nuts are inserted into holes in the bottom and it is securely held in place. It can be unbolted and moved. (Not in the plans!)


Lesson Leaned!

The poly dried and the color was gorgeous but all the brush strokes were visible and distracting. Apparently I hadn't used the correct type of brush.


So I sanded down the desk again (One would think I'd have had enough of sanding!) with the orbital hand sander using 220 grit sand paper.  The goal was to sand off all the high spots and reapply the poly, this time with a foam brush recommended by our local paint store. I also added extender to the poly to allow it to dry more slowly. That did the trick.


© 2013 Ashbee Design, Marji Roy

********************

Sharing this post at some of these link parties. They are worth checking out for other ideas.


Thursday, May 9, 2013

DIY Live Edge Desk

I haven't blogged much about my recent reorganization project for David (not too many people have a need to organize a kinetic sculptor's studio) but I just finished a project for him that is truly blog worthy. David (my hubby for the newbies) needed a desk space in the gallery area, and he wanted it to be more interesting than a kitchen table. Together, we designed and built a stunning live-edge birch peninsula desk that fits the space beautifully. It is artsy yet functional.


One end is supported by the wall and the other by the end we cut off the wood slab. Using the wall as a support provides excellent rigidity. And we love how the natural shape of the tree works well as the support.

We purchased a 2' birch wood slab roughly 22" wide and 9 feet long at our nearby Woodcrafter's Supply Store. In fact, David and I were in there shopping for a shop vac system and saw they had a supply of live-edge wood. It was knowing that I had a resource for such a beautiful resource that inspired this design.

Live-edge wood designs leave as much of the natural wood character as possible. We chose this slab because of the gorgeous wood grain and the imperfections - like this notch on one end.


 And this bump on one side........

We designed a very minimal desk to compliment this complex piece of wood. Although massive in weight, it floats in the space it bridges.


And, it's not just beautiful. It is functional as well! David does all his designing on the computer and is often working on two laptops at once. Here he has the space to do that, and have a cup of coffee as well.


I have spent a large chunk of time during the past three months helping David organize and upgrade his studio space. David's studio is located in the house next door (next door for us is a 400' walk through the woods). I designed this "house" to be a workshop/studio/gallery/guest house all within the basic structure of a contemporary split-entry raised ranch. Although it has the bones of a house (for resale value of course!) it is set-up in an entirely unique way for David and his kinetic sculpture business.


The lower floor is his workshop complete with some of the new organization. (See all those labeled storage bins? That would be my doing :-)


And the upper level is the gallery space.

In order to get the CO (Certificate of Occupancy) back in 1992 when we built this house, the structure needed a kitchen, so there is a minimal kitchen in place. The floor plan is open and what would be the living/dining/kitchen area (if this where really a house) are all open to each other. We put the desk where the kitchen table would be. David had been working on one of those old folding tables out of press board that weighs half a ton. Ugly, to be sure. And visible, hence the desire for something unique

Now he has this space instead.....


I think he can continuing being inspired here!

Tomorrow I will post a tutorial on how we made this desk. In the meantime, check out David's work here.

Update: Tutorial on making this desk is now posted here.


And his blog for WoodThatWorks.com is here.  That is my other job - maintaining his website and blog as well as this one.


© 2013 Ashbee Design, Marji Roy

********************

Sharing this post at some of these link parties. They are worth checking out for other ideas.