

Design considerations:
Our goal was to create a functional surface for working with two laptop computers at once. David wanted it counter height so he can stare out the windows as he designs. We knew it was going to be located in the kitchen area which serves as the office space for his gallery/showroom. The space is small yet functional and the desk, which is visible from the gallery needed to be a statement piece unto itself.
The actual design of this piece was then dictated by the incredible slab of live-edge birch we found for sale at a nearby Woodcrafter's Supply. Luckily we have a pick-up truck!

The slab was rough sawn. That means that hours of sanding would be required to make this into a piece of furniture. Here you can see the saw marks across the grain of the wood.

We don't have access to a planner and we also wanted to leave the character of this slab intact. We set up the slab on two folding tables in the garage and I started sanding with the belt sander Dave gave me as a birthday gift last year. DIY'ers like unusual gifts :-)!

I sanded in two hour sessions over several days. I smoothed out the worst of the saw marks with 50 grit paper and then repeated it with 80 grit paper. I sanded both sides.
The edges still had some sections of birch bark which I chiseled off and then I also sanded the edges trying to preserve the character including bug trails.

I switched to the hand orbital sander and continued sanding with 120 grit and then 220 grit sand paper. It smoothed out beautifully but I was shaking in my dreams once complete! It took hours and hours and hours of sanding!

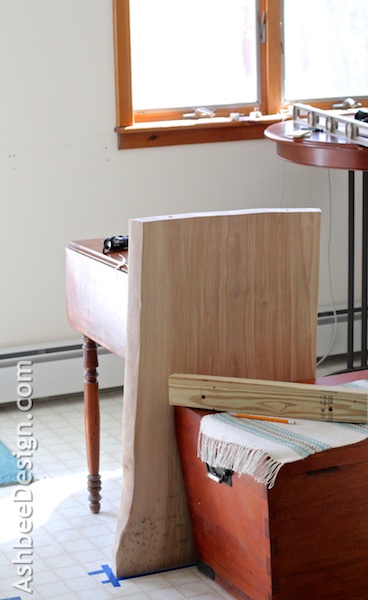
Next, using a skill saw and a guide board ( forgot to take a picture) we cut one edge square and cut off a section for the support leg. We knew the height we wanted. We then needed to put the desk in place to determine length and best direction of the slab.
David helped with all steps requiring moving the planks around. They are VERY heavy! He attached a temporary 2x4 to the wall as a bracket. We had some choices about location on the wall and wanted to know where the studs were.

First placement! It is all balanced here. We determined that another 6" needed to be cut off for best sizing in the space. We also determined the desk looked best with the notch facing out and the sides tapered down. The slab has a significant twist to it that needed to be mitigated with positioning.

We crafted a marking tool to help us cut the top of the support leg to match the bottom of the slab. We needed to match the bow. This tool is a small dowel with a nail through it. It scored a cut line along the leg.

We debated about using a hand-held saber saw or the band saw to cut the top of the leg. Either would have worked. We opted for the band saw to reduce sanding but you could easily choose the other if you don't have access to a band saw. We created a support structure using a rolling cart and a stack of cardboard to support the weight while cutting.

Meanwhile, David created a custom wall support in place of the temporary 2 x 4. This was made out of three matching lengths of 1 x4 pine stock glued together.


We used the miter saw to square up the ends of the wall support. Holes were drilled through this block from top to bottom for threaded bolts to slide into. On the bottom David drilled large holes to allow for a recessed nut. This system would hold the desk tight to the wall. You'll notice this desk has no cross supports. We are relying on the rigidity of the wall and the weight of the pieces to provide the needed cross support. (Again, I forgot pictures but if you scroll down there is a photo of the finished wall bracket.)
We needed to start worrying about keeping things square and level. We created a support system using odd pieces of furniture to hold the base square and in place.
Next we added standard adjustable feet to the bottom of the leg. These little fellas allow for later corrections and small adjustments plus keep the wooden leg up off the floor. This helps in cleaning.

We decided to attach the top to the bottom with threaded rod epoxied into place. Dave put little nails with the tops snipped off into the center of the hole locations on the base and then we lowered the top in place. This marked the center of the holes on both pieces. Dave drilled holes into the bottom of the top and into the top of the base using a jig to keep square.
The holes are designed for a 3/8" threaded rod to slide in. We tested the holes, making sure it fit together.

David used 5 minute epoxy to glue the threaded rod in place. At the wall end, the threaded rod was glued into the bottom of the top slab. At the leg end, the rods were glued into the top of the leg.

Once the glue dried we once again tested everything. Yes! We could get it all in place and it was strong. We applied glue (5 min epoxy) to the leg end threaded rod and added wood glue to the wood surfaces. We lowered the slab into place for one final time and allowed the glue to set.

And finally it was time to poly. Although I love an oil finish on wood, I am too practical to want to live with it. This is a desk in a kitchen. Low Luster Benjamin Moore Polyurethane was our choice.
We needed to paint the pine wall bracket to match the wall so we temporarily repositioned the desk, painted the bracket Navajo White and I polyied the desk. We had been patiently waiting for this moment. We knew this particular piece of wood had a beautiful wood grain, and we knew finishing it would accentuate it. We were excited to see how much. Yes, the poly did a wonderful job in increasing the beauty.

All sides of this plank were finished. It is just as beautiful from the bottom looking up.

Here is a photo of the wall bracket. The visible holes are screw holes for attaching it to the wall right into the studs. What you can't see are the vertical holes that have the threaded rod. Nuts are inserted into holes in the bottom and it is securely held in place. It can be unbolted and moved. (Not in the plans!)

Lesson Leaned!
The poly dried and the color was gorgeous but all the brush strokes were visible and distracting. Apparently I hadn't used the correct type of brush.

So I sanded down the desk again (One would think I'd have had enough of sanding!) with the orbital hand sander using 220 grit sand paper. The goal was to sand off all the high spots and reapply the poly, this time with a foam brush recommended by our local paint store. I also added extender to the poly to allow it to dry more slowly. That did the trick.


© 2013 Ashbee Design, Marji Roy
********************
Sharing this post at some of these link parties. They are worth checking out for other ideas.
Motivate Me Monday, Mop It Up Monday, Alderberry Hill, Metamorphis Monday, Tuesday Treasures,Today's Creative Blog, A Bowl Full of Lemons, Not Just a House Wife, The Inspiration Board, Romancing on a Dime, DIY Dreamer, Whatever Goes Wednesday, Transformation Thursday, House of Hepworths, Craftberry Bush, Jennifer Rizzo, One Artsy Mama, Craftionary, Flaunt in Friday, Tater Tots and Jello, Show and Tell Saturday, DIY Showoff, I Gotta Try That, Kathe With an E, The Girl Creative
You guys did such a beautiful job on that table. That wood is exquisite.
ReplyDeleteAs soon as I saw the selection in the store I knew we would some how make a live-edge table. If you are willing to go with the flow and not worry about precision, (the top has some undulating waves in it :-)) stunning things can happen, not because of our skill but because of the beauty of wood.
DeleteHi Marji, the first time I'm commenting here, reading some time longer ;)
ReplyDeleteYou found a wonderful peace of wood and left it's own character to it.
It's just beautiful :)) I wish David some real nice working hours on it with watching the deers in between :) And I'm going to follow his blog as well, just love his artwork :)
Have a fine weekend
Sigi
Thanks Sigi for stopping in, and taking the time to comment. Yes, David does enjoy watching the deer as he designs ( and turkey as well). Glad you stopped over on his website. He does fascinating work and it is a special time the two of us have here creating in tandem. Enjoy you day!
DeleteGreat pictures of teamwork! What a fantastic idea and totally awesome finished product! Just looking at your artwork makes my day a bit calmer :) You have got some special talent. Thanks for inspiring me!
ReplyDeleteWe are truly pleased with the end result. And except for the tome spent sanding, it was very easy. David and I have a great time working on projects together..
Delete