Monday, November 26, 2012

Silhouette Learning • Jar Labels

Keeping it simple here folks. Today I tried my second project on my new Silhouette cutting machine. I wanted to combine printing and cutting to make jar labels. These are jars in my almost finished laundry room that has me over-the-moon happy. I haven't shared the big reveal yet but you will get a sneak peak of a corner to see the new jar labels.


I collected peanut butter jars- the plastic ones. I keep them all because I know someday I will have a perfect use for them and it has appeared in the laundry room project. I built narrow under-the cabinet shelves for small odds and ends. When I built them I knew I would line up these peanut butter jars for organization. In them I keep my laundry treasures- things I find in pockets or at the bottom of the washing machine. In my house she who does the laundry gets to keep the money!


I will be spray painting the tops once the weather warms up again. (That might be wishful thinking and I may have to wait until spring!) My plan was simple - design a label in the Silhouette software, print the letters, have the machine cut the squares and then cut a border out of a contrasting color. Although registration wasn't critical I decided to try the registration feature on a simple project to see how it worked.

Below is the basic plan for squares on a sage green.  I am tying to wing it on this project. I want to see how intuitive the software is. So I entered the letters, filled them with black, switched the edge line to black and created the squares. I sent it to my printer and the words printed beautifully.


I then sent the file to the cutter and it cut beautifully. Registration worked but not only did it cut out the squares but it cut out every single letter also. That hadn't been part of the plan! I guess I need to figure out how to create things that aren't cut lines.

It was impressive to watch it quickly cut each letter. When I peeled off the squares the letters stayed on the mat.


The effect was kind of cool so I glued it down on a border piece which I cut out of dark green using the fancy border in the standard image file included with the Cameo - and then it wasn't so cool.
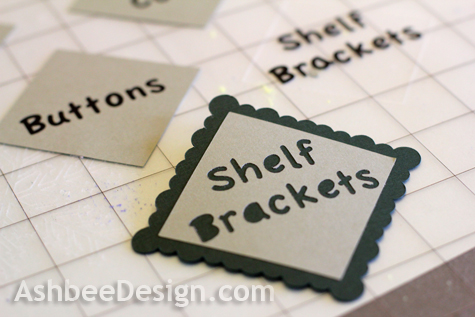

The labels looked silly without the letter centers and peeling the letter centers, applying glue and repositioning wasn't going to happen in a 48 pt font.

So I regrouped and created the printed labels in Pages and cut them on the paper cutter- probably the correct approach for the squares anyhow.


I then created a file with 9 back pieces and cut all of those on the cutting machine. Worked beautifully.

Using the box that the Cameo came in as a spray booth, I applied spray adhesive to the back of the squares, glued them each to a border, and then glued that to one of the plastic jars.

Now I need to go and read some directions and figure out how to add lines that don't cut!


Previous posts of interest:

©2012 Ashbee Design, Marji Roy

Sunday, November 25, 2012

Silhouette Beginnings • Learning How

My very special husband gave me a Silhouette Cameo Cutting Tool for my recent birthday. (Yeah, it was one of the "big" birthdays). If you look at the various Christmas Cards I have created over the past 30 years you probably thought I already had one. No, I've cut all those cards by hand for years. When I looked at the specifications of this machine I knew I had to have one and learn how to use it. I am a Silhouette beginner and I hope to share with you some tips and tricks but right now all I can offer is hints for getting started.


First let me note that no disclaimer is needed here. We bought the Cameo outright and have no connections with Silhouette so, yes all these opinions are my own.

I am a tad geeky. Ok, maybe a little more than a tad so the computer side of this all makes sense to me. I thought the directions packet, software installation and demo DVD were all excellent - except for one little missing clarification. In the directions it emphasizes that when you insert the cutting blade be sure it is "pressed completely into the holder." I put it in and pressed. What the directions didn't clearly explain is that there is a fin on the cutter and the cutter is only in place when that fin is rotated all the way to the right.


You can see the fin at the 4 o'clock position above. It looks like the following photo after inserting and rotating counter-clockwise. You must rotate the cutter, not press.


Family had arrived to celebrate Thanksgiving and I had successfully unpacked, set-up and started the machine (amidst minor pandemonium) with no issues until the first cutting. It didn't go all the way through the paper. I tried several times, adjusting the cutter depth and was still having inconsistent cutting. I put it all away to again take out after all the guests had gone home and peace and quiet had descended upon Ashbee Hill. I had to dig around the Silhouette site but finally found a mention about the placement of the black fin. Once I did that then the machine cut beautifully.

My next newbie problem is with the cutting mats. I chose a piece of card stock from my paper hoard to try the first successful cut. When I removed the paper from the sticky holding mat, the paper tore along the edges and stuck to the mat.


This happened down both sides of the paper. I have found that as the mat gets used, it gets less sticky. Hopefully this problem will disappear but I need to do more research and experimentation. It does create a problem though because I have been planning to use the cutter to cut holes into a paper I will use as a card, not cut shapes that I will use. Here are some photos of my first quick experiment using a stock pattern. 

I took a piece of 32 Lb white copier paper and programed the cutter to cut out a delicate snowflake in one quarter. My ideas was I would fold it like a card and slip a colored piece of paper behind the cutout snowflake shape. The cut was successful but carefully removing the paper from the sticky mat caused it to buckle, crease and curl. I tried folding it like a card but the paper was just too damaged to be useful.


However, the shape that remained - the white snowflake was in beautiful form so I glued that to deep blue wrapping paper and glued all of that onto a white paper card. This is my first quick Silhouette project.


I am wondering how to adjust the process so that I can use the background paper for some designs. I tend to think in negative space - not positive shapes.

Overall I am very impressed with this tool. I am glad I haven't designed a card before getting it because its strengths are different than I anticipated. I need to go find a good discussion forum and am planning to spend some more time exploring the Silhouette site.  More fun to come!

Thanks David!

Previous posts of interest:

©2012 Ashbee Design, Marji Roy

Saturday, November 24, 2012

Reindeer Ideas

It is quiet once again at Ashbee Hill. Kids and grandkids have packed up and traveled on. Our Thanksgiving together was wonderful. We served dinner to 21 and haven't begun to sort through the photos. There may be a post or two there to share ideas for pulling off a big feast but right now I am still recuperating. The house is still in disarray but it is a mess that I am thankful for. I am thankful for my wonderful family and that they love coming home!

As I sort through all I have to share, I will continue with my Christmas Idea series. One thing I am thankful for this year is Pinterest - such a great tool for organizing ideas that are image based. My Pinterest boards inspire me so. Today is a collection of reindeer ideas......

This first one was made by my dad and I have posted about him before here. Crafted from found fallen birch trees I love his rustic character standing guard in my yard.


This same concept has been crafted in many sizes and shapes to create reindeer of all different personalities.  Here are a few by others.

This first one would be easier to craft because it is a much smaller version of the one above. A family of these would look great on a mantle.


This little fellow appears to be a simplified marioneete. Reminds me of the puppet show in the movie version of  The Sound of Music. How's that for a childhood memory?
Source: Craft Gawker

Here is another tiny set but with added greens.
Source: KudzuKween

I love the personality of this guy. There is a wonderful tutorial if you follow the link to Pretty Ditty.
Source: Pretty Ditty - with tutorial

Save your holiday corks and craft these guys for next year.
Source: Curbly

And two totally whimsical ideas.....

What a great hostess gift this would be for any of the holiday parties you might be attending!

Update on the reindeer pictured at the beginning of this post...... 
This year he became Rudolph thanks to my grandson!
Previous Posts of Interest


©2012 Ashbee Design, Marji Roy