
I collected peanut butter jars- the plastic ones. I keep them all because I know someday I will have a perfect use for them and it has appeared in the laundry room project. I built narrow under-the cabinet shelves for small odds and ends. When I built them I knew I would line up these peanut butter jars for organization. In them I keep my laundry treasures- things I find in pockets or at the bottom of the washing machine. In my house she who does the laundry gets to keep the money!

I will be spray painting the tops once the weather warms up again. (That might be wishful thinking and I may have to wait until spring!) My plan was simple - design a label in the Silhouette software, print the letters, have the machine cut the squares and then cut a border out of a contrasting color. Although registration wasn't critical I decided to try the registration feature on a simple project to see how it worked.
Below is the basic plan for squares on a sage green. I am tying to wing it on this project. I want to see how intuitive the software is. So I entered the letters, filled them with black, switched the edge line to black and created the squares. I sent it to my printer and the words printed beautifully.

I then sent the file to the cutter and it cut beautifully. Registration worked but not only did it cut out the squares but it cut out every single letter also. That hadn't been part of the plan! I guess I need to figure out how to create things that aren't cut lines.
It was impressive to watch it quickly cut each letter. When I peeled off the squares the letters stayed on the mat.

The effect was kind of cool so I glued it down on a border piece which I cut out of dark green using the fancy border in the standard image file included with the Cameo - and then it wasn't so cool.
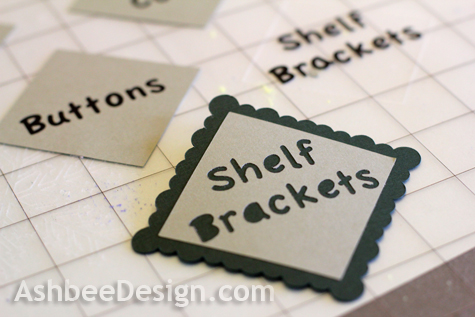
The labels looked silly without the letter centers and peeling the letter centers, applying glue and repositioning wasn't going to happen in a 48 pt font.
So I regrouped and created the printed labels in Pages and cut them on the paper cutter- probably the correct approach for the squares anyhow.

I then created a file with 9 back pieces and cut all of those on the cutting machine. Worked beautifully.

Using the box that the Cameo came in as a spray booth, I applied spray adhesive to the back of the squares, glued them each to a border, and then glued that to one of the plastic jars.

Now I need to go and read some directions and figure out how to add lines that don't cut!
Previous posts of interest:
- I Always Save...
- Silhouette Beginnings • Learning How
- DIY Christmas Card 2011
- Three Decades of Handmade Christmas Cards
©2012 Ashbee Design, Marji Roy
This comment has been removed by the author.
ReplyDeleteHighlight the letters, click on the scissors (cut style window), and then click on no cut.
ReplyDelete