

I built a drop shelf below the cabinets in my renovated laundry room. They are sized perfectly for these containers and I made labels for them as the very first project with my Silhouette Cameo back in November. There was a learning curve with the Silhouette and finally I just made simple lables. Design-wise, they are not my best work but more annoying was that they kept falling off the jars. The paper was too thick and didn't like the bend.

A re-do was needed. And I saw the following as I was roaming the aisles of Michael's with a 50% off coupon in my pocket. The colors were perfect for my laundry room and so it came home with me.

I wanted to print the labels directly on the Washi Tape and I didn't find any instructions on how to do it. I thought that if I put it on a shiny paper and ran it through the printer it would peel off. It took several experiments. I learned that the inkjet ink just bubbled up on the tape and I couldn't feed discarded Silhouette mat protective sheets through the laser printer. But I did find a procedure, that worked. It involves print twice on the same paper and requires care.
I used Hammerill Color Laser Gloss Paper (32lb) as a base. It has a very glossy surface yet can be printed on by a laser printer.

I created a document on my computer with the labels I wanted for the jars, one label per line. I played around with fonts and sizes looking for the correct combination. When I was satisfied I printed that document on the laser gloss paper first marking the corner that was on top and fed into the printer first. I did this to make it easier to figure out how to feed this same paper through the laser printer again. I used the manual feed tray. You can see the X in the corner. I didn't do this for the first experiment and I printed the second print backwards!


I printed exactly the same document a second time. The print appeared on top of the Washi tape. Although the registration wasn't perfect it was close enough (within 1/16").

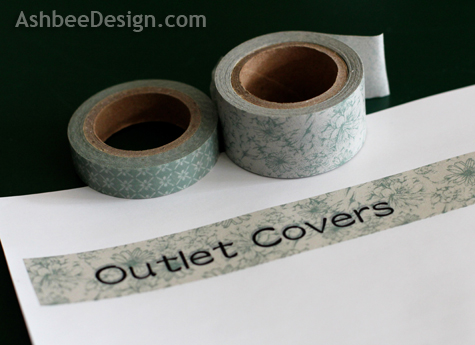
I printed only one line for this photo. I could have put tape on all 5 lines to feed through but I was still testing and didn't have enough tape to make mistakes.
The part that requires care is next. After you have printed on the tape, you peel it off the glossy paper. The tape does separate from the paper fairly easily but the tape also has a tendency to tear. Go slowly and evenly watching for tears to start on the edges. If they do, stop and help the edge along.

Apply the tape with printed label onto the jar. The Washi Tape did curl from the peeling but it uncurls quite easily.

Use the various colors to create a pattern.
Mine was a simple weave in the corner.


I also took the time to spray paint the lids of the Skippy jars to match.

Simple yet effective......
And much better than the original labels!


Has anyone else developed a technique for printing on Washi Tape?
Previous posts of Interest
- I Always Save.....
- Laundry Room Reveal: Extras and Creative Storage
- Silhouette Learning - Jar Labels
©2013 AshbeeDesign, Marji Roy
**********************
Sharing this post at the following Link Parties:
Hope to see you there as well!
- A Bowl Full of Lemons, Tuesday Treasures @My Uncommon Slice of Suburbia, DIY Dreamer , Take It On Tuesday, Whatever Goes Wednesday @Someday Crafts , Transformation Thursday @ The Shabby CreekCottage, House of Hepworths, Between Naps on the Porch, Tatertots &Jello, Show and Tell Saturdays, DIY Showoff, Motivate Me Monday @ Keeping It Simple, Get Your Craft On @ Today's Creative Blog, Metamorphosis Monday @ Between Naps on the Porch, Sweet Sharing Monday @ Sweet Anne Designs, The Inspiration Board, The Thrifty Groove, Home Sweet Home @The Charm of Home, Flaunt it Friday @ Chic on a Shoestring, Craftionary, One Artsy Mama, Dish It @ CusineKathleen, I Gotta Try That, Pintastic Tuesday, KatheWithAnE,Green Willow Pond

Such an awesome idea and no need for the super expensive coharu printer!
ReplyDelete~Wishy Washi Tape
Never heard of a coharu printer. Have o go check that out. Thanks for visiting and commenting.
DeleteA great tutorial. Wonderful use of the washi tape. Also like how you spray painted the lids
ReplyDeletethanks merry, I expect Washi tape and I will become very good firends.
DeleteI love my washi tape and have wondered how to get it through the printer. (My printer is shaking in fear right now - I have been experimenting with different thicknesses of cloth!). I will attempt this. Thanks for the clear tutorial.
ReplyDeleteWhoa, you are brave. I have never tried fabric in the printer. Any success?
DeleteI love the look of this! I just got my first rolls of washi tape in the mail yesterday and am excited to try this! I pinned and would love if you could share this at my linky party Thursday at http://www.juliakendrick.com! I hope you have a great day! Julia
ReplyDeleteSend photos if you do. Thanks for visiting.
DeleteThis is AMAZING! found you though Thrifty Groove...and I'm SO glad! I have a drawer FULL of Washi tape and no idea what to do with it. You, my friend, have just given me a Saturday afternoon project!
ReplyDelete-Lucy
I wish I had a drawer of Washi Tape! I just suggested that as a good Mother's Day gift from the girls. Send pictures of your project. Thanks for visiting and commenting.
DeleteThis is fantastic! I love the idea of printing on the tape. Thank you for sharing.
ReplyDeleteIt opens up lots of pretty organizational possibilities for sure. Thanks for taking the time to comment and visit.
DeleteI have never used this product before and now I can't wait to get some to try! Thank you for this fun tutorial! Thank you for sharing at TTF. Have a Happy St. Patrick's Day!
ReplyDeleteIt was my first time using it as well. Very easy to use but I wonder at its durability. Time will tell. Thanks for taking the time to comment.
DeleteAMAZINGLY SMART!!! I AM GOING TO DO THIS!!! Thank you so much for the tips and instructions.
ReplyDeleteSmiles,
Rachael
The Joyful Thrifter
Send pictures when you do! We all can use more ideas. Thanks for visiting and have a great weekend.
DeleteMarji Roy,
ReplyDeleteJust found you through Tatertots and Jello. This is an awesome idea and I will keep it mind when I redo or reorganize something.
Maureen
Quick, easy and pretty. What more can you ask for from an organizing project. Thanks for visiting and commenting.
DeleteGreat idea! Thank you for sharing
ReplyDeleteBrilliant!! Printing on washi tape. Love this. Now I NEED to go out and buy some.
ReplyDeleteOne never has enough colors of wash tape!
DeleteYou can also put your own prints/stripes/solids on paper medical tape, making your own strips of washi tape, and I have printed on paper as you did, then laid a strip of rubber cement on top, then stuck down twill tape to print on in the same way you did your washi tape!
ReplyDeleteDid you run the twill tape through a laser printer or an ink jet? Any special ink? Did it wash out? Interesting idea. Has me thinking. Thanks for sharing.
DeleteGreat idea! Thank you for sharing!
ReplyDelete--Cheryl--
Fantastic tutorial, Marji! Your revamped jars look ah mazing!
ReplyDelete