Saturday, February 2, 2013

Twig Heart Tutorial

On a surprise warm winter day I took time to collect supplies for this project. Most of it came from the stark New England roadside. Then, on a much colder day, I stayed inside and made these Valentine hearts for my entry ladder.


As promised, here is the tutorial:

Supplies need for EACH heart
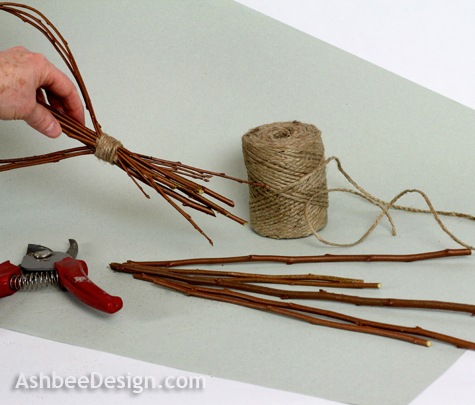
  • 6 green twigs- I used the new growth branches clipped from roadside bushes. They need to be 3 feet long with no side branches and very bendable. Test them because some branches snap when bent.
  • Assortment of curly vines - mine were bittersweet which is also quite flexible and also harvested along the roadside.
  • Several sprigs of red berries. I used dried bittersweet berries but other red berries will work (even faux berries)
  • Twine
  • Hot Glue
  • Clippers
  • Scissors


The Process:
  • Collect the supplies.


  • Test your branches for bendability. You want them to be able to bend like this....


  • If they snap find a different variety.
  • Take six in one hand. Arrange them so their tips are all within 3" of each other. You don't want them lined up but you also don't want them too staggered.
  • Be sure the tips can bend down to form the heart shape. If they can't, rearrange the sticks.  


  • About 14" down from the top you will make the top knot. This one will be right beneath the split in the heart. (Here is a link to a video showing the specifics of making a whipping knot - thanks to reader Lynne Carothers for sharing the proper name!)


  • To start this knot take a length of twine about 24" long and make loop running along the twigs as shown above.


  • Take the long end of the loop and starting at the bottom of the knot, wrap the twine tightly around the stems and both ends of twine forming the loop.
  • Work your way up toward the loop with tight, closely place wraps of twine.
  • Make 6-8 wraps around the twigs.
  • After 6-8 wraps take the end of the twine and thread it through the loop you placed there and pull it tight.


  • Grab the other end of the twine, the end that is still hanging out below all of the wraps and pull it down.  It should pull the loop down tightly on the top trapping the end behind the twine rounds. If you don't feel like it has pulled securely into the inside of the wraps then add a dot of hot glue to the ends to hold them in place. 
  • When dry cut the twine ends.
  • You should have a snuggly wrapped knot holding the twigs together.
  • Bend three twigs down on each side of the center to form the heart shape.
  • While holding them in place make a second knot at the base. It is the same type you made above.


  • After the knot is complete, take the clippers and clip off the long fat ends of the twigs at an angle. Leave the tips.
  • I left about 4-5" and cut at random lengths.

  • Take short pieces of curly vine, especially lengths with character, and wrap them around the sides of the heart.


  • The vines with their curly ends add a funkiness to the heart. I added 3-4 sections of vine to each heart.
  • Slide short sections of red berries into the knots. Use a touch of hot glue to hold them in place if you aren't able to get them firmly wrapped in the vine.


  • Then make some more.... to add to a ladder, hang in your windows, or share with special friends.


Previous Posts of Interest:


©2013AshbeeDesign, Marji Roy

**********************


Sharing this post at the following Link Parties:
Hope to see you there as well!

    Comments? Please note - Effective Feb. 11,2013 I am turning on word verification on this blog for commenting. The blog has been the target of spam comments for the past couple of weeks and I am getting flooded.  This is a short term effort to get spammers to move on. I will take off word verification again in a few weeks and see if that cleans up things or not. I apologize for the inconvenience.

    Friday, February 1, 2013

    Valentine Ideas • DIY Twig Heart

    Time for me to update my entry ladder, the one I made last spring and have changed with each season. With February's arrival, I updated it for Valentine's Day. This ladder is made from branches and reflects my tendency to incorporate nature into many of my designs. I started with using red plastic solo cups to try and design something creative and weatherproof but that lasted all of 10 minutes of effort. Just not my style. Instead I made rustic hearts from green sticks, twine, bittersweet vines and berries.


    I'll post a complete tutorial with my next post because I have been working on improving my photography. I have over twenty images to share and that will make connection time too slow so come back tomorrow for the how to with all the step-by-step photos. Today, enjoy my photographic efforts. ( update: Tutorial is up here)

    I made five hearts in a range of sizes. The thickness of the twigs determined the smallest I could craft - which was about 9".


    I searched back to memories from my Girl Scout years so many, many years ago and I used a knot designed for pulling in the ends. I thought it was the long shank but when I looked that up I discovered a long shank knot is something else. I'll keep looking but I haven't found it yet. (Update: Here is a link to a video showing the specifics of making a whipping knot - thanks to reader Lynne Carothers for sharing the proper name!)


    I added more twine and, after taking out the Christmas arrangements, I hung these rustic hearts from the rungs of my handmade ladder. This is probably the 8th different seasonal arrangement I've made in this ladder, and it is the first time I thought of moving the ladder off my north-facing porch and into the sunshine to get more vibrant pictures!


    After the photo shoot I moved it back near the door for more photos.....


    I love the red berries (which I pilfered from the Christmas arrangement!) against our siding color.
    The twig hearts are a perfect addition to the black birch ladder, which is starting to sprout little white fungi!

    Update: Tutorial for the hearts is up here.
    Additional update: See the hearts dressed in snowflakes after the blizzard here. Incredibly beautiful.

    For those of you just joining my blog, here are links to a few of the other ways I have decorated this ladder over the past year.

    Christmas Ladder

    Christmas Ladder with Lights:

    Pumpkin Ladder

    Daisy Ladder for June


    A Ladder of Branches • DIY - This is tutorial for making the ladder.


    This project inspired me to continue exploring ladders in décor. I collected them ll into a theme page with links to many, many different ways to use ladders in decor


    ©2013AshbeeDesign, Marji Roy

    **********************

    Sharing this post at the following Link Parties:
    Hope to see you there as well!


    Thursday, January 31, 2013

    Valentine Ideas • Incire

    Yesterday, I learned something new from another blog and I just have to pass it on. (That is why we blog, right?)

    I have been thoroughly enjoying my new paper cutting machine and have been out there pinning ideas. I came across the blog Extreme Cards and Paper Crafting which I started to follow a little while ago. The post there yesterday had me stop what I was working on and immediately switch gears to try out something new. Something new that is old.


    It is called incire, or cut,fold and tuck. It is a paper crafting technique that I can find no history on but one that I have tried years ago. What this blog did for me was teach me the name - incire. And if you have a name, Google search is your friend!

    Not only did Carol from Extreme Cards and Papercrafting share the name but she also has the files for this project available for download! I immediately downloaded them and was cutting away within minutes! Thank you Carol! I made this solid red version first.

    Carol's sample used double sided paper. I didn't have any with print on both sides but I do have a selection of papers with print on one side and white on the other so I then tried my pink heart version. Here is an angle shot so you can see the cut, fold and tuck technique.


    And an action shot!


    I used my Silhouette cutting machine but the cuts on this template are really simple. This design could be made by hand using an xacto blade, no Silhouette necessary.

    Taking this concept a little further has me excited. I did a Google image search on Incire and found many exciting examples. I know that years ago I saw an example of an Incire border like this one made into bookmarks by  Ellany over on SplitCoaster Stampers.


    That inspired me to modify the concept and create my Christmas Card from 2006 pictured below. But that was long before I had a cutting machine and I made 70 of these with an xacto blade!


    My image search showed me my idea was not the only Christmas tree and that there is a design out there for one that includes the more traditional tuck aspect of Incire which mine did not. This one also comes from the Extreme Card website.


    Looking forward to exploring this concept further.


    Previous Posts of Interest:


    ©2013AshbeeDesign, Marji Roy

    **********************

    Sharing this post at the following Link Parties:
    Hope to see you there as well!