

Although this tutorial isn't a step-by-step guide, I will share the general information so you can attempt a version yourself.
Materials:
- PVC pipe: Mine was from a recycled old newspaper rack that I no longer need. We used to save our newspapers for recycling but we no longer get newspapers. I cut it up and saved the pieces. I used 1" diameter and included 6 pieces about 15" long each. You can vary this for different sizes.
- PVC adapters for the diameter you choose: 2 T adapters and 1 straight through connector.
- 5 minute epoxy
- nylon string
- round tooth picks
- crafting needle - heavy duty
- dental floss threader
- duct tape
- spray paint
The Process:
- I started with the scrap PVC pipe.

- I cut it and reassembled it to make this structure. It is composed of three straight units connected with PVC joints to form a 3-D "I" with the top and bottom perpendicular to each other. After I had the pieces my desired length, I took it apart.
- Incidentally, mine has the joint on the middle leg only because that was needed for the size scraps I had. It is fine to have a full, straight piece with no connector there.

- I measured and marked every 1/4" along both the top and bottom legs (but not the center one) and drilled holes all the way through the PVC. The holes were large enough to thread my nylon string through on a large craft needle. Test your supplies to make sure they can thread through.

- Reassemble the pieces into the 3-D "I" but this time glue them together with 5 minute epoxy.
- Spray paint it a color of your choice and allow to dry and set over night. In the end I sprayed it a different color to match the string so you could skip this step if you want it to match.

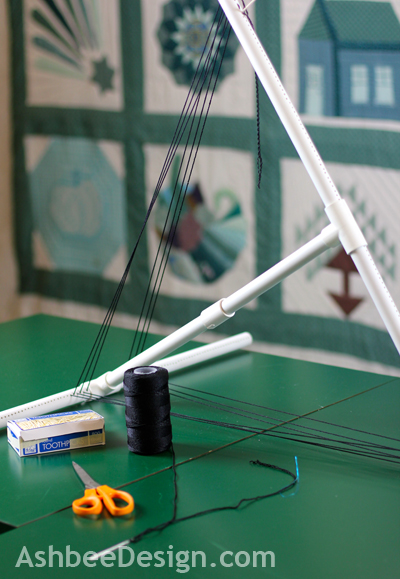
- Start threading.
- Use dental floss to help thread the nylon string through the needle and then thread it through the outer most hole on one of the cross members.
- Put a toothpick in the hole pinching the string and keeping it from sliding out.
- Go from the outer most hole to the inner most hole on the other cross member. Thread from the inside to the outside and then loop back into the next hole.
- Thread from the outside to the inside and up to the opposite cross member's most outer hole.
- Keep reating this pattern always going in the same direction around the base structure. On one leg you will be moving from outside in, one hole at a time. On the other you will be moving from inside to out, one hole at a time.
- Below you can see the first three rounds completed
- Here is a view showing the thread looping out from one hole and going back down into the next with the toothpicks pinching it in place.

- Continue threading the sculpture.
- Put a toothpick in at the beginning and end every time you need to cut a new piece of string.
- Pull them tight as you go along.
- Tighten loose ones as they appear.

- When the entire sculpture is threaded, go back and tighten all the strings.
- Pull on the loops and insert toothpicks to hold.

- Once everything is tight and even, start glueing.
- Mix up a small batch of 5 minute epoxy.
- Get a small glob on the end of a round toothpick and stick it into a hole. You will stick one into every hole from the outside. Pull the string tight yet again before inserting the tooth pick.
- All holes will have an ugly tooth pick sticking out when you are done with this step. Very Porcupine!

- Add a drop of glue to all of the inside holes as well. This is a precaution.
- Allow it to dry over night.
- Take a hack saw or other similar tool and cut off all the toothpicks.
- Some of the string might get cut as well. If you did a thorough job of gluing this shouldn't matter.
- Mine looked like this at this point.
- Take duct tape in a color of your choice and tape over the remaining loops and epoxy. Place a strip right up the spine of each leg.
- I used three layers of tape completely covering the outer cross pieces.
- You can spray paint the final sculpture if you want all parts to be the same color. I had started with black string and I sprayed all the white PVC black.


Previous links of interest:
- String Sculpture Model • Sculpture Week
- Photographic Study of Concrete Spheres
- Sculpture Week 2010
- Sculpture Week 2009
©2011 Ashbee Design, Marji Roy
Sharing this post at the following Link Parties:
Hope to see you there as well!
- A Bowl Full of Lemons
- Not Just a House Wife
- Take It On Tuesday @ Romance On A Dime
- Tuesday Treasures @My Uncommon Slice of Suburbia
- Simply Sensational Tuesday @ Organizing Homelife
- Uncommon Designs
- DIY Dreamer
- Whatever Goes Wednesday @Someday Crafts
- Transformation Thursday @ The Shabby CreekCottage
- aka design
- House of Hepworths
- Between Naps on the Porch
- At The Picket Fence
- Fridays Unfold @ Stuff and Nonesense
- Potpourri Friday @ 2805
- Tatertots&Jello
- Show and Tell Saturdays
- DIY Showoff
- Motivate Me Monday @ Keeping It Simple
- Get Your Craft On @ Today's Creative Blog
- Metamorphosis Monday @ Between Naps on the Porch
- Sweet Sharing Monday @ Sweet Anne Designs
WOW!!!! Now that's interesting!! Love it!!
ReplyDeleteThanks so much for sharing this at The DIY Dreamer... From Dream To Reality!
Amazing....and such a terrific tutorial....can't wait to see it hanging in your woods.
ReplyDeleteVery impressive!
ReplyDeleteSuch a wonderful way to bring art to the landscape. Love it!
ReplyDeleteWow - that looks so incredible! Thanks for linking up at Romance on a dime last week. Hope to see you tomorrow!
ReplyDeleteCreative!
ReplyDelete