
Supplies needed
- 1 piece aluminum window screening 6" w x 20" long - I purchased 1 roll of 36" x 84" bright Aluminum screening at Lowes. You can vary the size to create different sized ornaments.
- 20 - 1/2" wooden red beads - I bought red bead garland and cut them off.
- 3 feet 1/8"wide red satin ribbon
- dull scissors (Save your old ones for this type of project. Don't use your sewing shears!)
- big darning needle (large enough to thread 1/8" ribbon through)
- gloves - to protect your hands
- ruler
- marker

Steps:
- Measure a 6" x 20" strip of Aluminum screening.
- Use a permanent marker to mark it.
- Put on some thin gloves to protect your hands.
- Using old, dull scissors cut the screening.

- Place the screen along a sharp edge (I used my desk surface) and bend back about 3/4" along both long edges.
- The desk edge helps create a straight line. This finishes the rough edges.


- Fold back both long edges and crease.

- I used the handle of my shears to crisp the crease.

- Fold the entire length of the the 20" piece into a zig zag fan with each fold being about 1".
- Crease them as you move along.

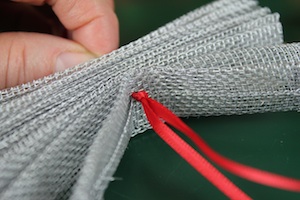
- Thread a piece of 1/8" red satin ribbon and stitch through the center of the fan.
- Create a loop about 2" longer than the ornament and thread back down through the center again. This will form a loop to hang the ornament from.

- Tie a knot close to the screening on both sides of the the aluminum. This will hold the pleated screen together tight in the center.
- Get another pice of ribbon about 2' long and thread it on to the needle.
- Thread the needle through the first fold of the fan about 3/4" down from the end. Leave about 4 " extra ribbon dangling at the end. You will tie up to it again when you have completed the circle.
- Thread a red wooden bead on to the needle.

- Push the needle through the next fold of the fan aiming for the same placement - about 3/4" down from the end.
- Add another bead.
- Thread through another section of the fan fold.

- Continue working your way around the circle.
- Connect the split between the two halves of screening.
- Continue until you have completed a circle of red beads.

- Tie the end of the ribbon to the beginning pulling tight to hold the beads in a circle.
- Take some leftover screen and pull off an aluminum thread from the cut edge.

- Use this aluminum thread to "stitch" together the seam where the two halves of the fan meet. You don't need a needle - just thread it through and twist the ends together.
- I found two stitches on the front and one or two on the back joined together the halves. It smoothed out the opening between the halves and made for a more complete circle.

The end result is a beautiful rosette ornament.


You can vary the size and the number of fan folds to change the proportions. A trio of these rosettes in varying sizes would make a wonderful window ornament.
Previous Posts of Interest:
- DIY Christmas Ornament #1 • Screening
- Handmade Christmas Cards Through the Years
- DIY Christmas Cards • Pierced Designs
I love the use of aluminum! How wonderfully creative! The aluminum/silver color is a natural for the season...they look modern and festive! I would love to have you share them at my party! http://theshadyporch.blogspot.com/
ReplyDelete