Again I am using the same aluminum window screening that I picked up at Lowes and the red wooden beads. This is my fourth tutorial and if you like this style of ornament you should also check out the following tutorials as well:
Supplies needed:
- 1 piece aluminum window screening 2" w x 30" long - I purchased 1 roll of 36" x 84" bright Aluminum screening at Lowes. You can vary the size to create different sized ornaments.
- 12 - 1/2" wooden red beads - I bought a red bead garland and cut them off.
- 3 feet 1/8" wide green satin ribbon
- dull scissors (Save your old ones for this type of project. Don't use your sewing shears!)
- big darning needle (large enough to thread 1/8" ribbon through)
- gloves - to protect your hands
- ruler
- marker
- pliers
Steps:
- Using a Sharpie marker and ruler measure 1 piece of screening 2" w x 30" long.
- Use dull scissors to cut the screening. I like to wear garden gloves during these first steps because the edges of the screening are extremely prickly.
- Fold over both long edges along the entire length of the strip.
- I bent it over the edge of my desk top to form a straight fold.
- I used first my finger to crease back the folded edge and then ran the handle of the scissors along it to smooth it out.
- Cut the ribbon into 5 pieces - 8", 7", 6", 5",and 4" long.
- Pull a strand of aluminum "thread" off the edge of a scrap piece of screening.
- Bend each strip into a loop.
- Overlap the ends by about 1/4" and stitch them together using the aluminum thread. You don't need to use a needle. The aluminum has enough rigidity to thread by itself.
- Twist it around itself to knot it.
- Clip the ends and bend the ends back out of sight.
- Repeat this with all five loops.
- Be careful to keep an elliptical shape and not crease the screening.
- Loop the green satin ribbon in half and tie a knot about 3" down from the middle. This will form the loop to hang the ornament from.
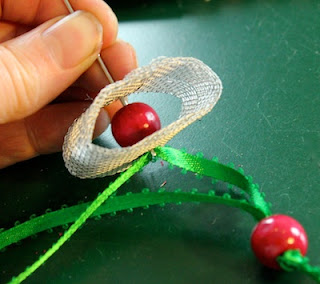
- Thread both ends of the green satin ribbon through the darning needle and thread through 1 red bead. You might need to do the ribbon in two steps, 1 with each end depending on how large the hole in the beads are compared to your needle.
- Next thread one end of the ribbon through the SMALLEST screen loop. Start on the side away from the seam.
- Thread it through a red bead.
- Thread it out through the bottom of the loop through the double layers of the seam.
- Thread it through the top of the next loop in size order.
- Add a bead in the center.
- Thread it out through the bottom of the loop again at the seam area to help reinforce the seam.
- You will be bringing the secong end of the green ribbon through this same path. I waited until the end but it would probably be easier to bring the second green end through after every two beads.
- If the needle is difficult to get through, grab some pliers and pull with those. It helped a lot.
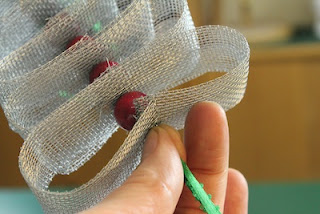
- Continue threading each loop with a bead in the center until all five loops are attached.
- Bring the second end of the green ribbon through as well.
- When both ends of the green ribbon are threaded through all five loops pull both ribbons through so they are snug.
- Tie off the bottom with a knot right up against the screening of the bottom loop.
- This will hold your tree form.
- Thread two more beads onto the bottom of the tree.
- This will be the tree stump.
- Again, tie a knot up tight.
- Add two more beads at the end of each of the green ribbons.
- Put knots at the end of each ribbon and cut at an angle.
Here are photos of other ornaments I have created using similar materials but different techniques. The links are to tutorials. I have made all of these and many more with just the one roll of aluminum screening!
Previous Posts of Interest:
- DIY Christmas Ornament #3 • Daisy
- DIY Christmas Ornament #2 • Rosette
- DIY Christmas Ornament #1 • Tree Ribbon
- Handmade Christmas Cards Through the Years
- DIY Christmas Cards • Pierced Designs
©2011 Ashbee Design, Marji Roy


Oh My! These are great! I've never seen screening material used to make decorations. What an original idea! :-)
ReplyDeleteWhat length do you cut ribbon for each ornament tree? Super idea!
ReplyDeleteRibbon for each tree was about 3feet long.
Delete