This tutorial creates wonderful wispy ghosts that can easily be used in centerpieces, on door stoops, on hearths, wherever you want to add a touch of Halloween.

Add a few flickering LED tea light candles and they come alive!

Definitely spooky!

Tutorial:
Supplies:
- Cheese Cloth 1 package for every 5 ghosts
- Plaster of Paris- We made 20 ghosts and used about 10 lbs dry.
- Assorted Paper tubes - Paper towel, wrapping paper or make your own from old manilla file folders
- Round objects for head molds - ping pong balls, X-Mas balls, craft balls, burned out light bulbs, etc.
- masking tape
- saran wrap
- Play dough or other clay for support during construction
- Black Paper - good quality so it won't fade
- Glue gun and glue
- LED flickering tea lights
Process:
• Make support armatures for the ghosts.
• We made five different sized armatures each about 1" shorter than the last. Size really depends on how and where you want to display them.
• We reused each armature 4 times so we made them strong enough to with stand that.
• Cut each paper tube to the desired height. Ours were 4",5",6",7" 8".

• Make a smaller diameter tube for the arms. I used old manilla file folders cut in strips and wrapped double layer around a wooden dowel. I taped it together with masking tape.


• Push the arms into the body. This is only an armature and all of it will be removed and discarded when done so beauty is not required.

• Using masking tape, tape all of the parts of the armature together.
• Use play dough or any type of clay like material you have to weight down the bottom. Here is our family in five sizes with hot pink and yellow feet!

• Loosely drape saran wrap over the armatures. This will facilitate the armature separating from the plaster and allow for easy removal and reuse of the armature.
• Again we use a little masking tape to hold things in place.

• Pre-cut the cheese cloth. After some experimenting we found 3 layers of cheese cloth was about perfect for the degree of transparency we wanted.
• We cut the cheese cloth to length and the re-folded it to be three layers thick.
• Leave enough cheese cloth to arrange around the "feet" and create a good standing surface.

• We prepared five ghost armatures in advance and then started mixing the plaster of paris. Once the plaster is at the perfect consistency, it sets quickly. You want to be all set to move before you begin.
• We placed each armature on its own tray which also was covered with saran wrap. this is to make clean up easier. Side note: Plaster was much easier to clean off plastic than metal so if you have plastic trays, choose those.
• We moved outside for this part because it was a beautiful day and plaster work is messy!
• I save shower curtain liners after they have been discolored by our water. They made perfect drop clothes on the patio for this project.
• I also brought out a card table and covered that with another old shower curtain liner.
• Karen started mixing plaster.

To Mix plaster of paris:
Plaster is one of those things that is hard to get perfect proportions from measuring. Humidity effects it. When in art school I learned this process.
• Use luke warm water. We discovered an inch in a small bucket was about right for five ghosts.
• Do NOT touch the water or mix it.
• Carefully sift plaster into the water with out touching the surface.
• Keep sifting plaster until small islands start to form on the surface and do not sink. This is what the plaster will look like when it is okay to mix. This process takes longer than you would think.

• At that point (and never before) you submerge your hands and start mixing.
• If you mix too soon the islands will form right away and the plaster will not have enough plaster to actually set.
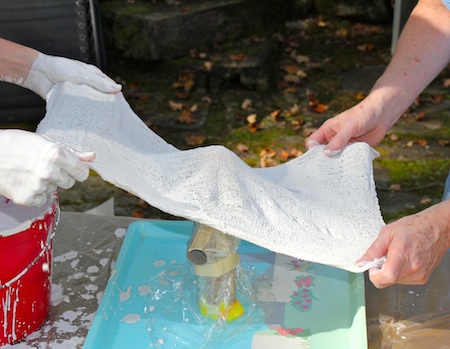
• Take the first piece of cheese cloth and submerge it, squeezing plaster through out the mesh.
• Remove it and squeeze nearly all of the plaster out of the cheese cloth.

• Working with a partner, stretch the cheese cloth back out. This part of the project is much, much easier with a friend although I have done it alone with small ghosts before.
• Place it over the armature centering it over the head.
• Drape it down around the body.
• Spend a few moments adjusting the folds, arranging the drape around the feet, fitting the cloth in to define shoulders. You have just a few moments to "sculpt" the ghost.
• Practice makes perfect and we learned as we went along.

• Once you are satisfied with the ghost move him/her to the side to set and start on the second one.
• The plaster will start to thicken in about 5-10 minutes and you will not be able to continue with that batch so move quickly!

• Let the plaster set. It takes a good 30 minutes.
Some clean up advice:
- Never put plaster of paris down the sink drain. Never! We had a bucket of water outside to rinse our hands.
- Allow Plaster to set before trying to clean up. It pops off plastic in solid lumps when set.
• When set, carefully remove the armature and set it up for a second batch of ghosts.
• The saran wrap should allow the armature to easily separate from the harden plaster.
• You may need to crush the cardboard armature to get it out if you arranged the draping cloth too tightly.
• Let the guys dry over night.
• Cut matching eyes out of black paper. I folded the paper over and did two at once so they would be a matched pair.

• Add a few dots of hot glue....

• Give your ghost some personality by playing with eye shape or mouths.

Scatter your ghosts around to scare the goblins away!


Previous Posts of Interest:
- Candy Corn Center piece
- Making the Most of Moss
- Buckets of Ideas
- Seed Pods • Beautiful Design for Free
©2011 Ashbee Design, Marji Roy
Love this idea, even pinned it to my holiday board on Pinterest! They look great!
ReplyDeleteThose are really cool! Thanks for stopping over at my blog today and poking around. I'll be doing the same here!
ReplyDeleteI will be attempting these this week! Thanks for the great tutorial. I blogged about it at http://bethannecreates.blogspot.com/2011/10/finally-decorating-for-halloween.html
ReplyDeleteOh my gosh this is so awesome! They turned out great!
ReplyDeleteI'd love for you to link up to the very first Fresh Friday Link Party!
http://www.releasemecreations.com/2011/10/fresh-fridays-link-party.html
These are awesome! What a great idea! I found your blog for the Fresh Friday Party. I'd love you to stop by my blog loveofhomes.blogspot.com
ReplyDeleteThanks,
Sally
I love these, what a great idea.
ReplyDeleteyessssssssss! thanks for these Halloween decoration ideas . This year’s Halloween is going to be more creative and hopefully cheap too. lol :D
ReplyDeleteAngels by tying the head, methinks.
ReplyDelete