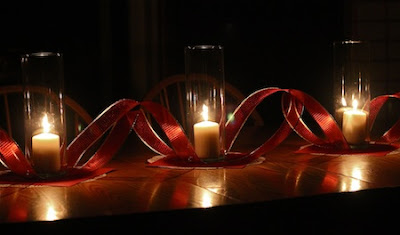
My idea started with a huge roll of wired nylon sheer ribbon edged in gold. I picked it up at one of those 90% off all things Christmasy sales. I was going to use it to create a variation on my ribbon hearts from last year but I was distracted by the beautiful curls that just fell into place as I unwound some ribbon to use.
Creating is most interesting when your ideas change direction because of an inspiration that hits you while working. I allowed the ribbon to unroll and keep its natural curl. That caught my eye and my imagination. At that point my previous plan was scrapped and I improvised. I just loved the curl.
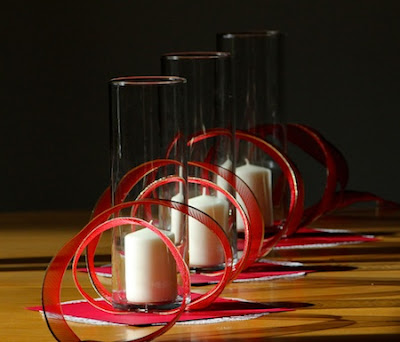
- Starting at one end of the table I allowed the ribbon to unfurl down the length of the table, leaving its natural curls in place. (Sounds like a hair dressing lesson!) I placed a glass cylinder onto the curl where it touched the table to hold it in place. I put three cylinders on the ribbon in three places, each at a low point, 1 in the center and one out each curl.
- I draped the ribbon over the edge and cut it about 1 foot below the table edge.
- I then started at the other end of the table and brought the ribbon back. Because I was going in the opposite direction the curve of the ribbon was opposite the first ribbon and I nested them and positioned it so the ribbons crossed under the glass cylinders.
- Under each cylinder I placed a paper doily and a 8.5" square of red card stock paper.
- I also put a small glue dash (you know the kind that peels off) under the ribbon near the ends of the table to help hold it in place.
- At both ends I allowed the ribbon to drape about 1 foot and the cut the ends in a classic ribbon v cut.
- I put candles into the glass cylinders and, in less than 1/2 hour my center piece was complete!
It is stunning to watch both the sunlight or the candle light create shadows and visually plays.
Supplies Needed:
- Ribbon: Length is two times the length of your table plus 4 extra feet for the over hang. I used a wired sheer nylon ribbon with gold trim but many other wired types would work as well. What's in your stash?
- Three glass cylinders - or other candle holders. A little weight is necessary. Doesn't need to be the clear glass. I'll bet three brass candlesticks would look great as well.
- Three Candles
- Three 8.5" square pieces of red card stock
- Three 10.5 " paper doilies
Time for you to go and buy some supplies for a Valentine Centerpiece. Share photos!
This post has been shared on:
Previous Posts of Interest:
©2012 Ashbee Design, Marji Roy


Another one! Sent this to my daughter, as she's the more "crafty" one. Absolutely adorable.
ReplyDeleteI like this idea! Very simple but elegant! Blessings My Friend,
ReplyDeleteVery elegant!
ReplyDeleteThis is a really cute idea! Inexpensive and quick to create...the perfect storm!
ReplyDeleteYour absolutely right! Easy peasy done and so inexpensive.
ReplyDeleteYou always shared us great ideas.
TY for sharing.
Greetings from freezing Stockholm.
/chie