Tuesday, January 31, 2012

Branches • Sliced!


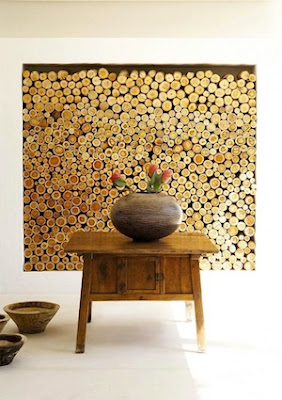
I am continuing with the series about bringing the outdoors in through branches but today looking at the cross-section, that is, branches that have been sliced. The types of projects and applications for this shape can be very different. A common one bouncing around the blogs these days is to fill your fireplace with logs, solidly and ends out. Obviously this is a treatment for non-functioning fireplaces and it does create a wonderful pattern.

origin –  via

In fact this treatment has become so popular folks are doing it with other openings as well. It isn't limited to fireplaces. The size of the stick impacts the pattern.


Others take the logs or sticks and slice them even thinner and use them as a wall covering. What I especially like about the treatment below is the random pieces left long to serve as hooks.  Brilliant! Not sure I'd want a large wall done in this fashion but one wall in the entry would make a great statement.


Using sliced logs or branches as a garden path covering is also an option. I do wonder how often they need to be replaced due to rot though. Although visually beautiful I would think it is a maintenance nightmare.


I especially like the floor application and it is available in small scale as a door mat from CB2. 

Or for entire floors.....


If you like the impact, here are a couple of ideas that definitely could be DIY projects. First, yet another mirror application.  (This one could have been in my round post yesterday!) I like the use of multiple diameter slices here.


But the application of sliced branches that made stop and look was this one...


I love this wall collage made of short lengths of birch branches.  It combines so many elements of good design all into one. If you make one, it can be totally flexible and fit any space. I see a great project here for me but I think I'll choose a location first.


Previous Posts of Interest • The Branch Series • 2012
©2012 Ashbee Design, Marji Roy

Monday, January 30, 2012

Branches in the Round • Wreathes, Etc.

Yet another category of using branches is the circular format seen in the crafting of sticks and twigs into wreathes or mirror frames. It is interesting how something so linear adapts to this presentation.


I especially like the above example and wish I knew what type of branches were used. The fractal qualities that emerge are fascinating. With a little deeper Internet work I discovered my answer! This design is by Japanese artist Ruth Asawa and the branches are not branches at all but sculpted from wire to resemble branches! Beautiful!


Above is another circular design but centered around a mirror. Small twigs were used. The edge was treated with more precision than the first example giving a less wispy effect. This example is available for purchase at a store (follow the via link) for over $200. Invites a serious DIY attempt!


Above is another mirror application but this time straight sticks without interrupting branches were used as a material.  They were attached in an almost helter skelter fashion creating a very different design. Again I thought it was handcrafted but by following the links discovered it is available through West Elm! 

So lets find some handcrafted DIY branch wreaths!


The above wreath is handcrafted by Kristine at The Painted Hive.  She has a tutorial at her site. I've blogged about this wreath before and it has inspired many of us crafters. My growing driftwood stash is for this project!


Jackie at The Crafting Mom created this wreath use a very different type of branch and the resulting wreath is has a different effect. It resembles a pen and ink drawing, almost calligraphic, because of the thinness and darkness of the line.

My last photo is a visual trick because it isn't a circular design at all.


It is a stick structure and its reflection creating the circular illusion. It is created by Scottish sculptor Andy Goldsworthy. One of my favorite artists, his work speaks volumes about the beauty of nature. If you have some time to spare, do a search and explore the breadth of it.


Previous Posts of Interest • The Branch Series • 2012
©2012 Ashbee Design, Marji Roy


Sunday, January 29, 2012

Branches Framed

Many have taken branches and framed them. Doing so seems to say to the viewer, "Yes, I am a branch, but I am also art!" You know the old saying, "You can't see the forest for the trees." (Pun intended!)


I love how the shadow becomes part of the composition.

The example below is a different approach with a branch painted white and arranged in a dynamic composition against a framed background.


In this next room the branches were used to build the frame as well as the composition within it. Very striking against the rich brown walls.

via 

Although I love bringing the outdoors in, you can still use the branches outdoors. Here is a framed panel as a focal point in a garden.


And below the branches are used to fill the frame of the garden gate.

In many of the framed branch samples there is no back leaving the beauty of the wall covering to show through. That is especially true with this black frame against the beautiful wall covering. The sticks have been stripped of their bark to provide a wonderful contrast.


The frame could also be that of a railing. Here is a handsome, rustic stair railing made from branches.


Click through to the previous posts below of for more inspirations about using branches in the home.

Previous Posts of Interest • The Branch Series • 2012
©2012 Ashbee Design, Marji Roy


Saturday, January 28, 2012

Putting Branches to Use • Shelf Supports

If you have been following this series you will have started to gain an understanding of how widespread the theme of branches is in home decor. If you're just arriving, click back on the links at the end to see my other branch posts.

If you have a source of trees and branches, there are so many creative ways to use them in the home. Today, I'll share a collection of applications in which they have been incorporated as shelf supports. I was amazed at the variety.


First, a simple addition of a birch branch to a partial box.  It elevates the simple shadow box to something so much more. This could be an easy DIY project if you start with an orphaned drawer and cut off one side.  Imagine using an old drawer with beautiful dovetail joints in the back corners? This is one from a collection of birch shadow boxes available on Etsy from Urban Plus Forest.


I am loving this shelf unit crafted into a window corner catching the light for a collection of plants. The integration of the branch into the shelf design is stunning.


Live Wire Farm makes shelf brackets from branches. Very simple, rustic yet still tasteful.


This construction is quite funky, clearly located in a urban loft. Bringing a little country into the city I do believe.


This one is a combination of the above two designs and I love the multi levels dictated by branch location.

And over on Etsy I found this series of shelf/shadow boxes that are unlike everything else.  In fact the branches are fabricated but oh, I love them so..... They are created by Teresa Audet.


Previous Posts of Interest • The Branch Series • 2012
©2012 Ashbee Design, Marji Roy

Friday, January 27, 2012

Putting Branches to Use • Branch Hooks

Although I love branches just for their own beauty, their structure lends to being put to practical use as hooks. The V formed by a branch just begs to be used for hanging a hat.  Here are some great examples.


This display (above) is not only a wonderful hat rack but also a sculptural collage. I have a perfect place for something just like this. I think I'll need to start looking for more branches of a slightly thicker variety.

Salvaged branches can be used for all types of chores in the kitchen.....


Or bathroom.....

If you find the perfect piece of a weathered branch, it can serve as multiple hooks.


If you live in one of those vast areas of America where trees are scarce but you love the look, you can purchase branch hooks from many crafters on Etsy.


Branch hooks are a great way to introduce a little bit of the outdoors into your home.  It is a concept that is an easy DIY project if, like me, you have an endless free resource of branches. Crafting and installing a row of these automatically creates a conversation piece just as people hang their hats.  It states, right by the door, "You are entering someplace special!"

Previous Posts of Interest
©2012 Ashbee Design, Marji Roy

Thursday, January 26, 2012

Red Dancing Sticks • DIY for the Winter Garden

Yesterday it was white sticks. Today it is red. Read on....


Remember my post about all the sticks I have been collecting? Well, I used one of my stashes of collected sticks to create five frolicking figures to grace my winter garden.


They could stay inside as well....


I have been searching for branches that resemble dancing forms.  This fall, after the October snowstorm, many tree tops littered our woods and I went out with clippers looking for two legs, and two arms connected with a torso.  When looking for such shapes you must study the branches upside down because that is the way the human forms grow in the trees. Here is a sample of one right-side up being a tree but looking like a person standing on his head!


These forms grow in the crowns of trees so the storm damage provide easy access to many tops. I went out with clippers and harvested five. The steps for making them into frolicking folk are quite simple.

Dancing Sticks Tutorial:

Supplies needed
  • Branches shaped like people
  • 1 screw eye for each
  • String
  • Spray paint- color of your choice
  • Round logs for bases


Equipment needed:
  • Branch Clippers
  • Band Saw
  • Drill Press
  • wooden mallet


The Process:
  • Once you have found your branches, use the clippers to clip them down to size.  I found leaving the legs and arms disproportionally long added to the visual motion.
  • Screw a screw eye into the head end and thread a piece of twine or string through it.
  • Use the string to tie the stick to a tree branch so it spins freely.

  • Use the spray paint to spray all surfaces. It spins beautifully from the tree but creates a rather unsettling site - many stick bodies hanging and spinning in the breeze. I chose red red because it is a complement to the summer green but stands out against the winter white. 

  • As always with spray painting, read the label, watch the temperature, work in a well ventilated place, and do many light coats.
  • While drying, cut logs for bases.  My trees were about 3 -4' high and I used logs about 6" in diameter. David helped :-) 

  • Drill a hole into the end grain of the log base.

  • We drilled it larger than the leg and filled the space with scrap wood. It allowed us to better position the dancing figure.

  • We then brought them outside and positioned them strolling along our stone retaining wall. The red adds much to the winter garden.


This project took a long afternoon. I finished these folk several weeks ago and I have been waiting for the perfect snow to take final photographs and share them. Today it is over 50º outside! No snow in site. Time to share. I will photograph them against a pristine white snow and share it when we get it!

Idea credit:
I have a dancing stick created by Nathaniel B. Smith of Duxbury, MA. He doesn't seem to have a website or I'd add a link. He is a tree smith, and saves branches he finds. He carefully peels off all the bark and makes beautiful indoor sculptures with them.  Here is our original dancing stick. What grace.


My outdoor variety is quick and easy. The original shows hours and hours of work which adds to its beauty and grace.

Previous Posts of Interest